How to Enter BIOS and Open XMP3.0 in Three Easy Steps!
Since AMD's platform for DDR5 has not yet been released, today we will first introduce to you how to open XMP3.0 on the Intel platform of the four major motherboard manufacturers! To open XMP, you must first enter the BIOS. It's really simple, just follow the steps below.
Reminder
Manual overclocking requires a lot of knowledge and information, maybe we will get to that later in the future!
1. After powering up or reboot your PC, press DELETE repeatedly to enter BIOS
No matter which motherboard it is, it's all the same, just press DELETE repeatedly right after you powering up the computer! Press it until the BIOS screen appears. Because the screen response is relatively slow, it will be too late if you see the screen entering Windows!

Reminder
As you can see, you can enter the BIOS without a mouse, but not without a keyboard!
2. Open XMP
The following is an introduction to the methods of the four major motherboard manufacturers in alphabetical order!
(1) ASUS
a. Press F7 to enter advanced mode.
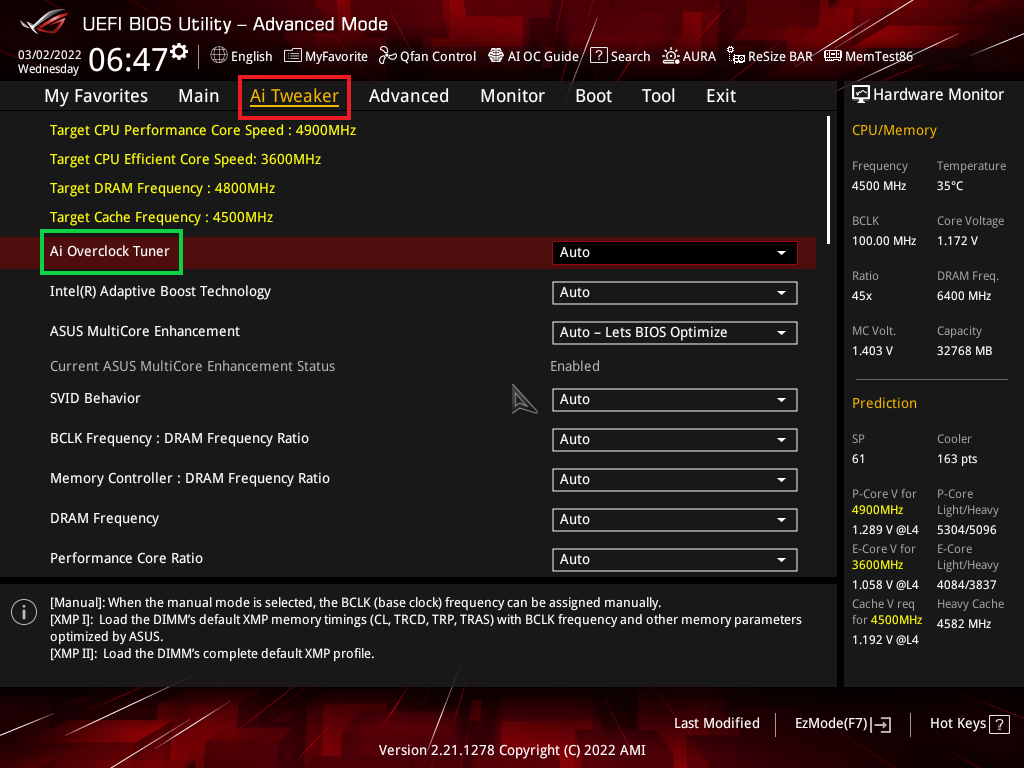
b. Press the Right Arrow key to move to Ai Tweaker (red box) and select Ai Overclock Tuner (green box), press Enter.
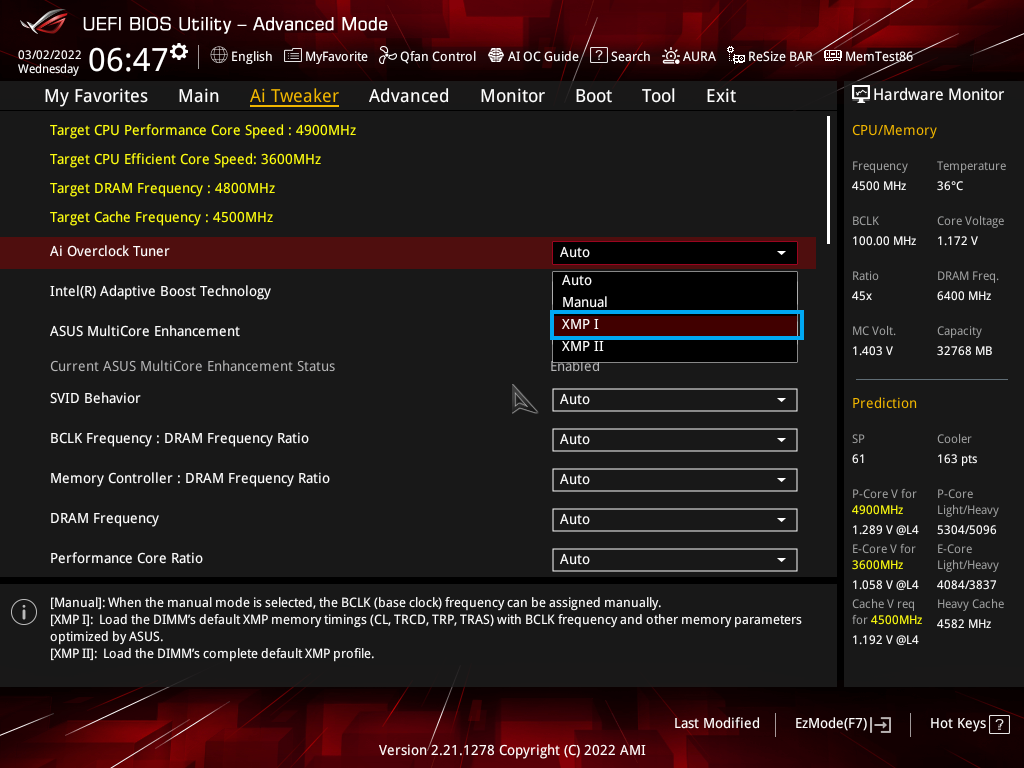
c. Select XMP I (blue box), press Enter.
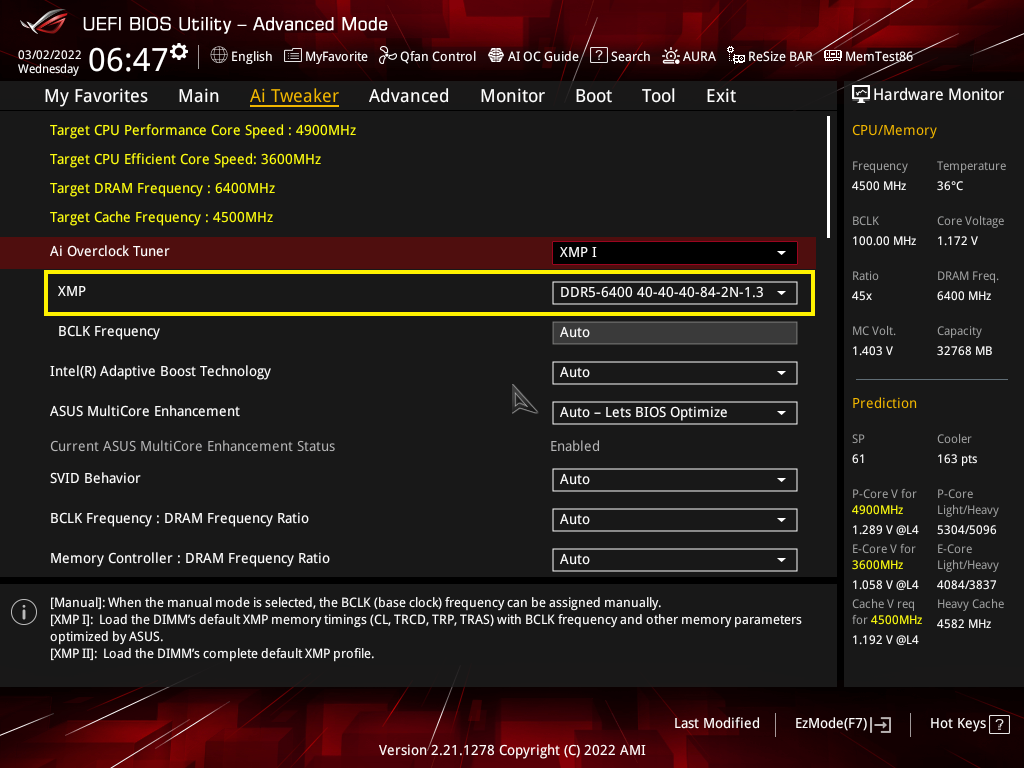
d. You will see an additional line of XMP's information under Ai Overclock Tuner, and the frequency (yellow box) indicated by the manufacturer of the memory you bought (yellow box). Next, press F10 to save and exit to enter Windows.
(2) ASRock
a. Press F6 to enter advanced mode (A description in the green box in the upper right corner)
b. Press the Right Arrow key to move to OC Tweaker (red box) and select DRAM Configuration (green box), press Enter.
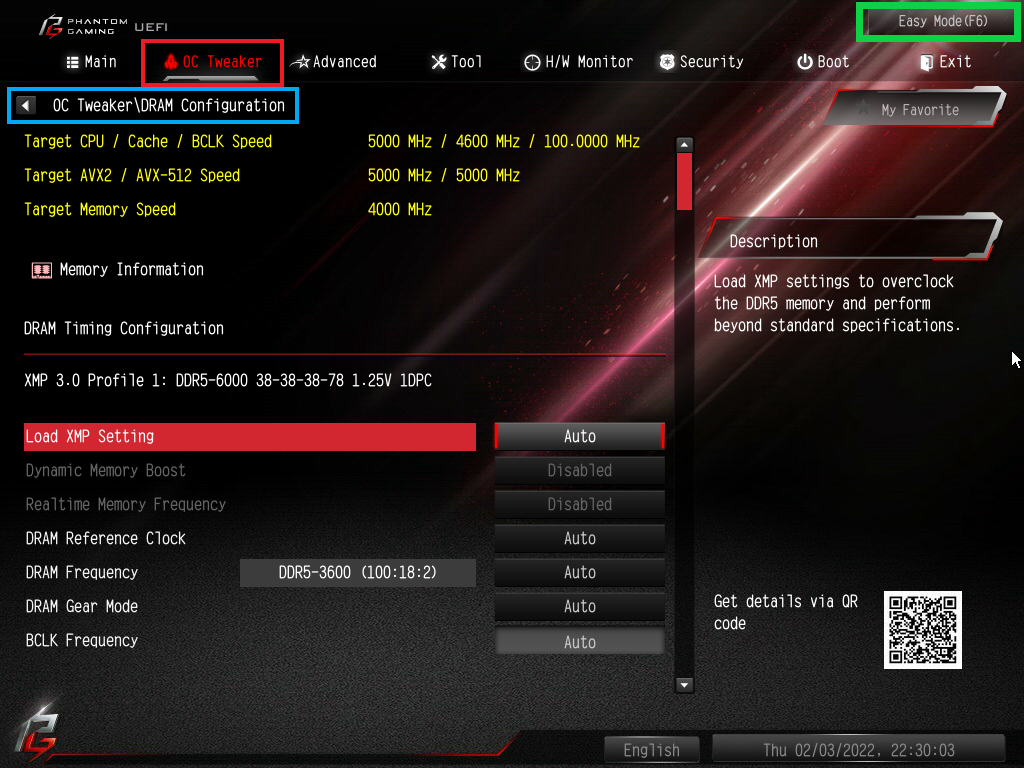
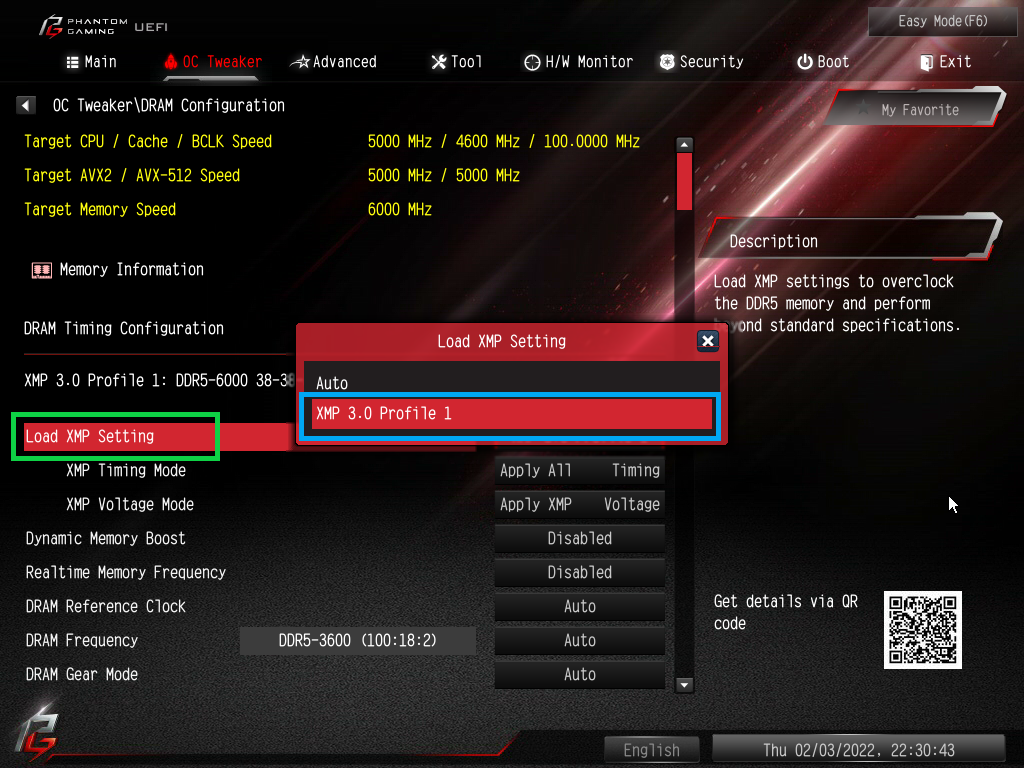
c. Find the Load XMP Setting (green box), press Enter and select XMP 3.0 Profile 1 (blue box), press Enter again to confirm.
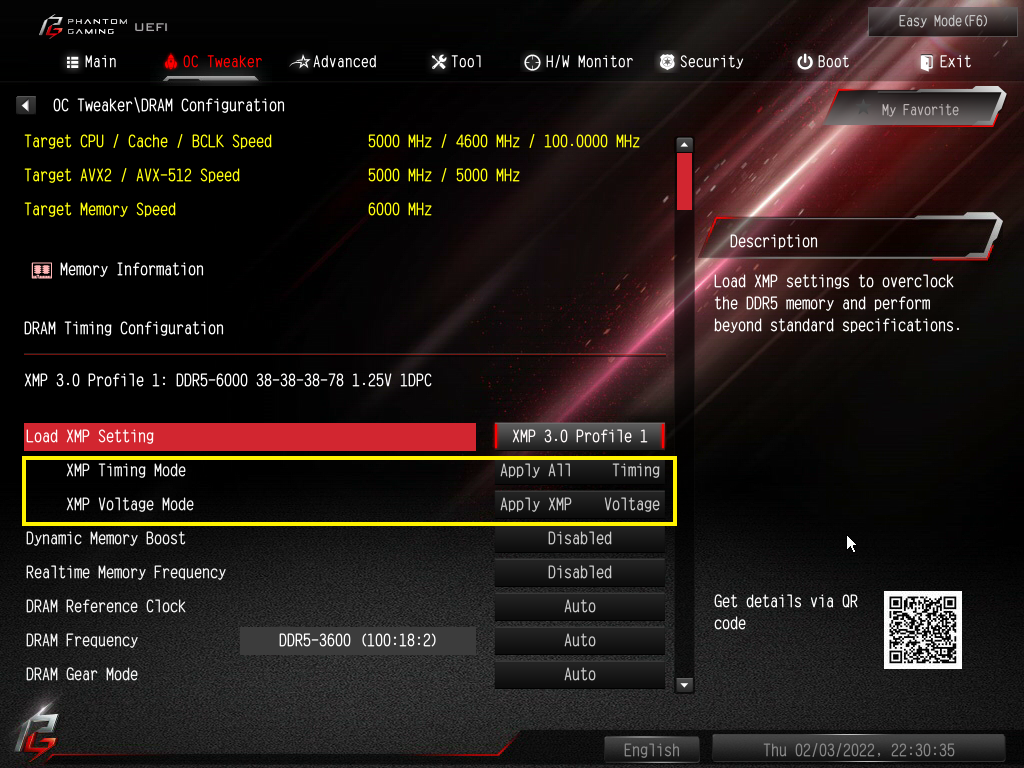
d. You will see the XMP information (yellow box) under Load XMP Setting, then press F10 to save and exit to enter Windows.
(3) Gigabyte
a. Press F2 to enter advanced mode
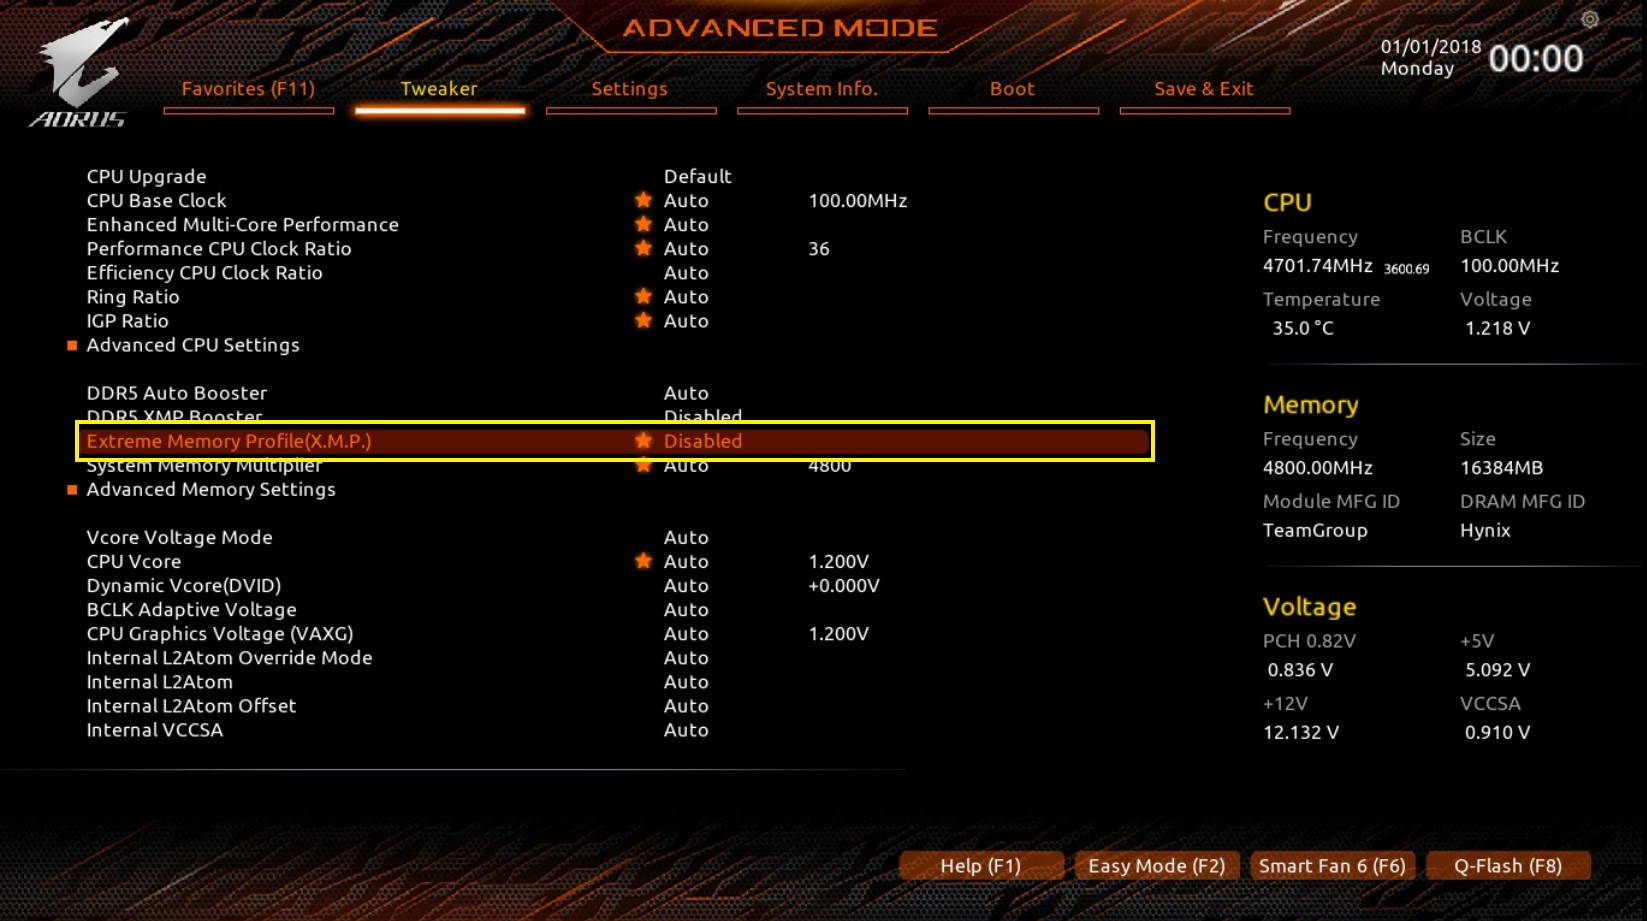
b. Move to Tweaker (red box) at the top, select Extreme Memory Profile (X.M.P) (blue box), press Enter.
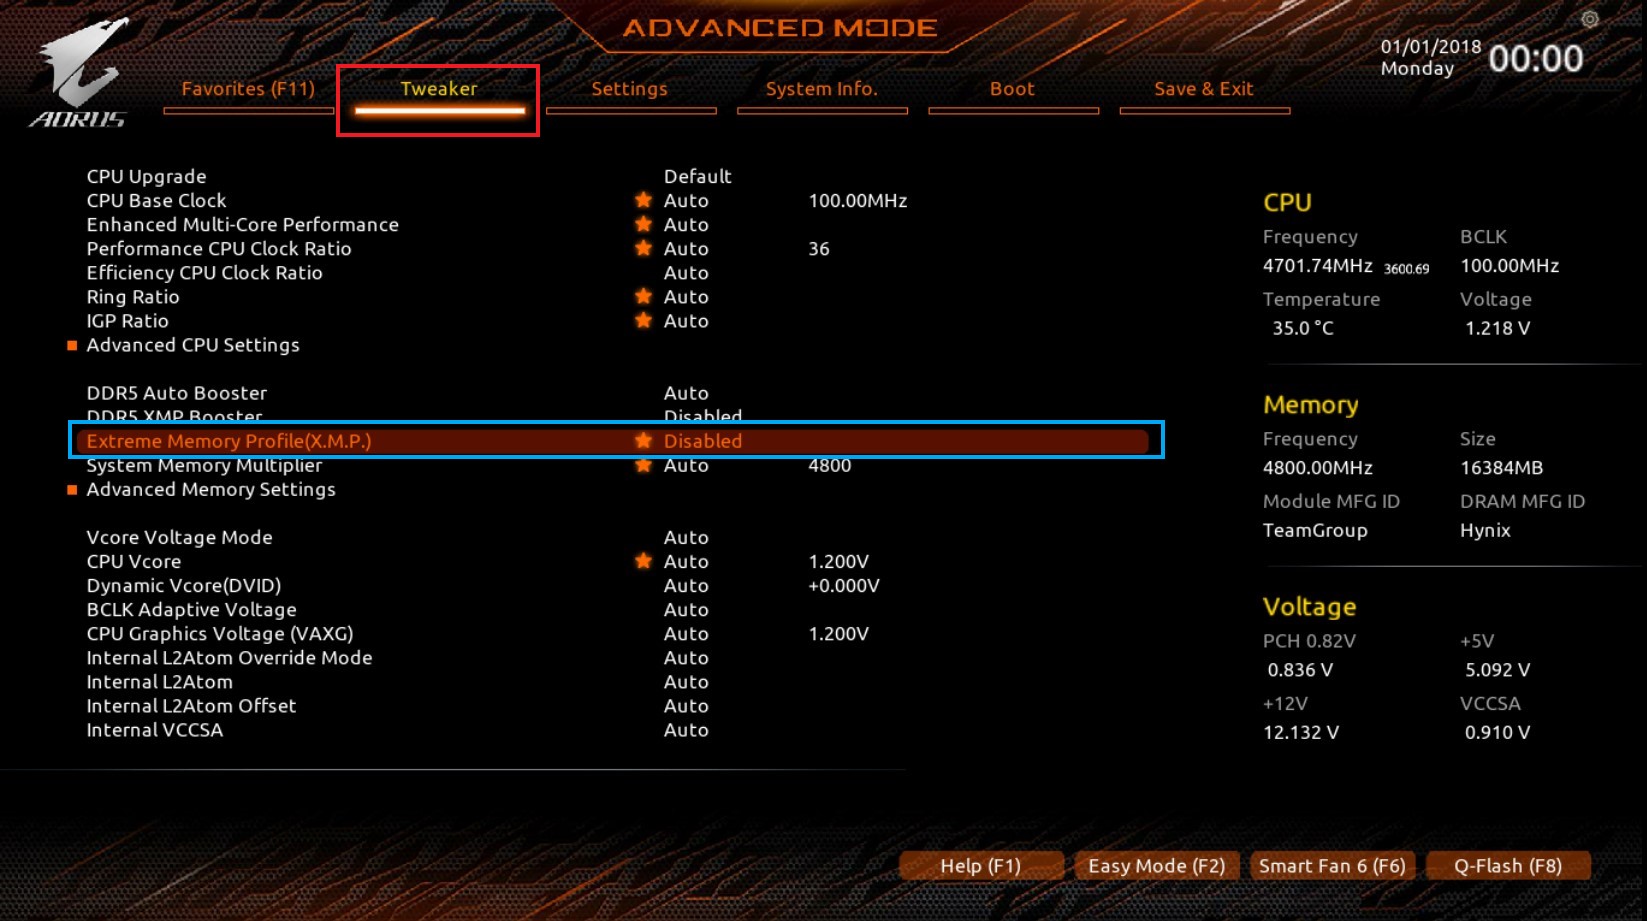
c. Select Profile 1 (blue box), then press Enter to confirm.
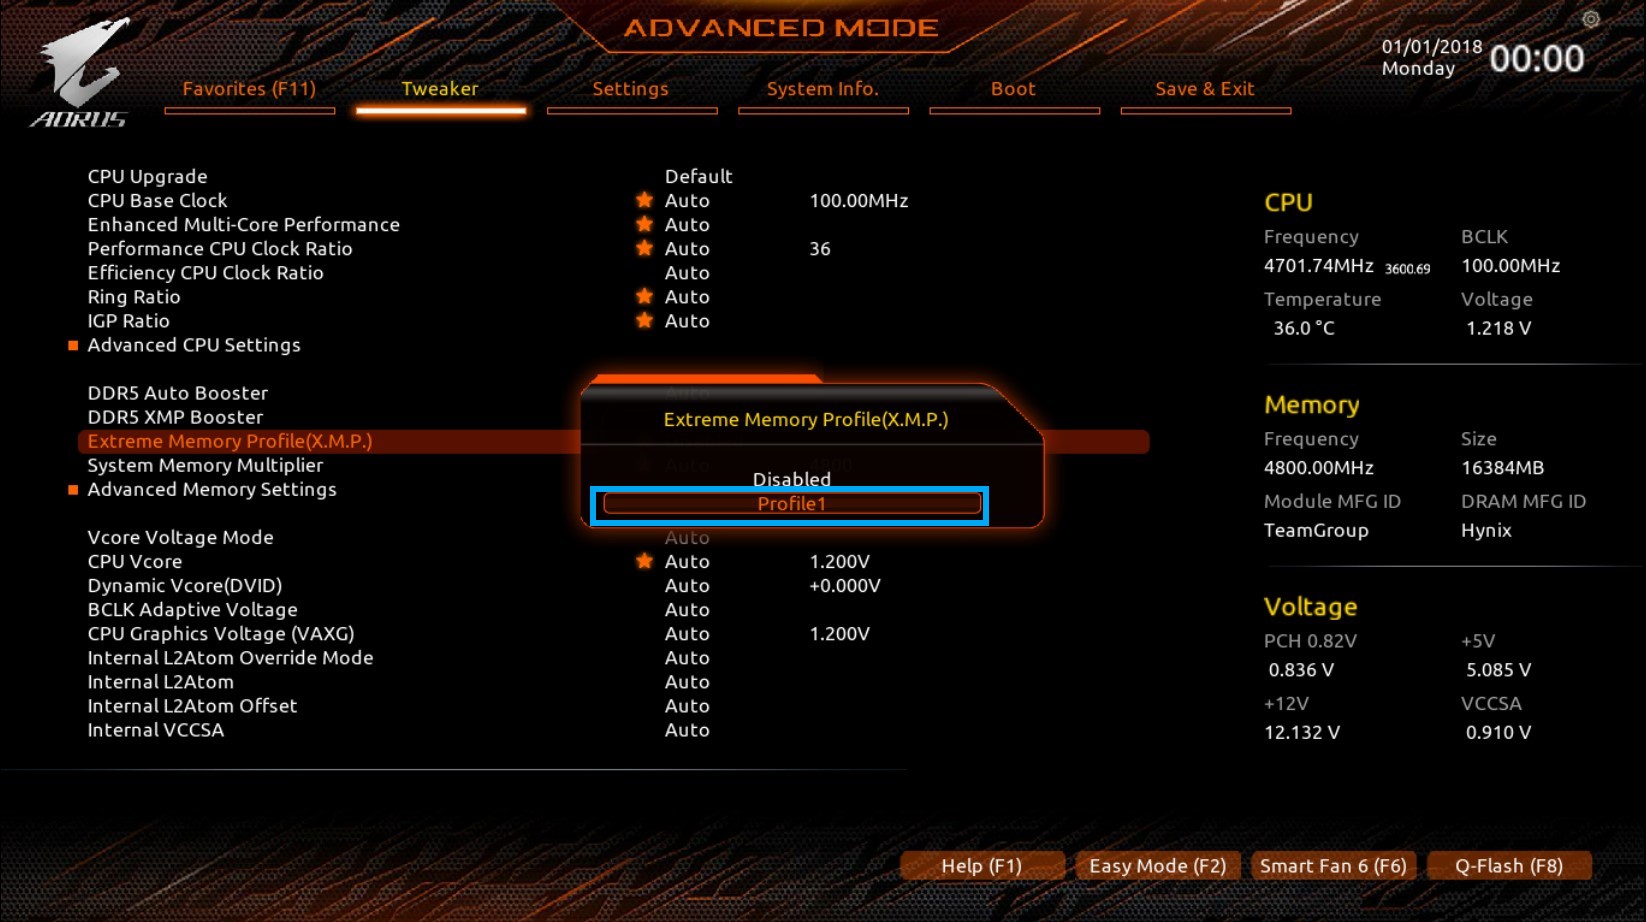
d. You will see the XMP information (yellow box) after Extreme Memory Profile (X.M.P), then press F10 to save and exit to enter Windows.
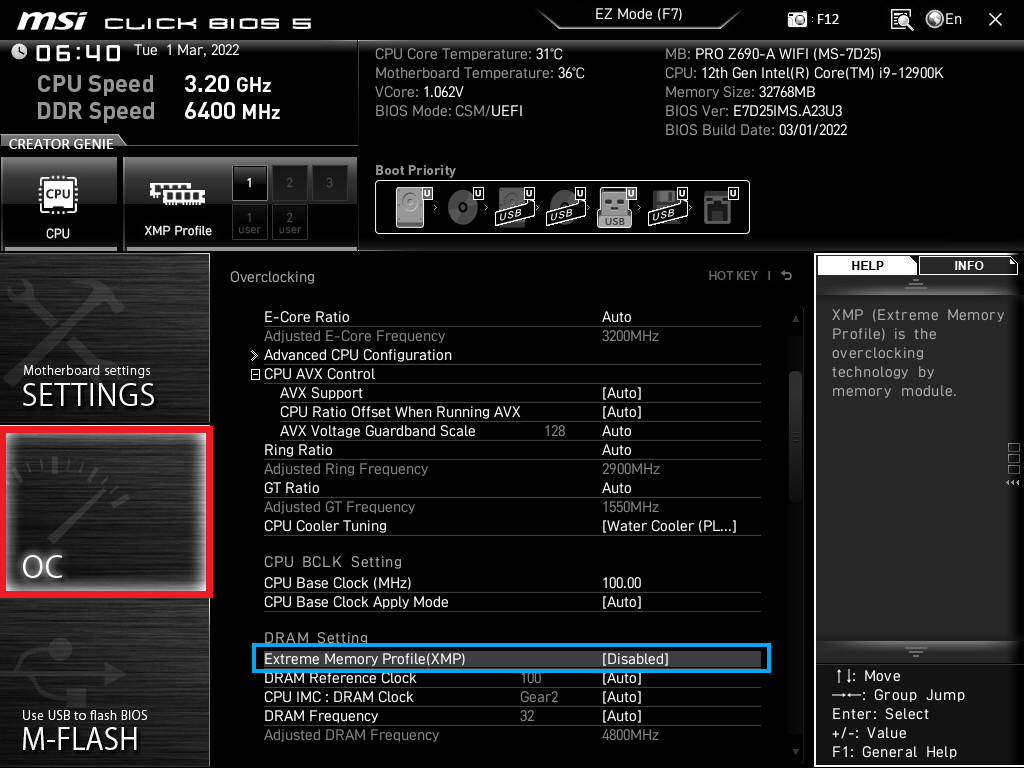
(4) MSI
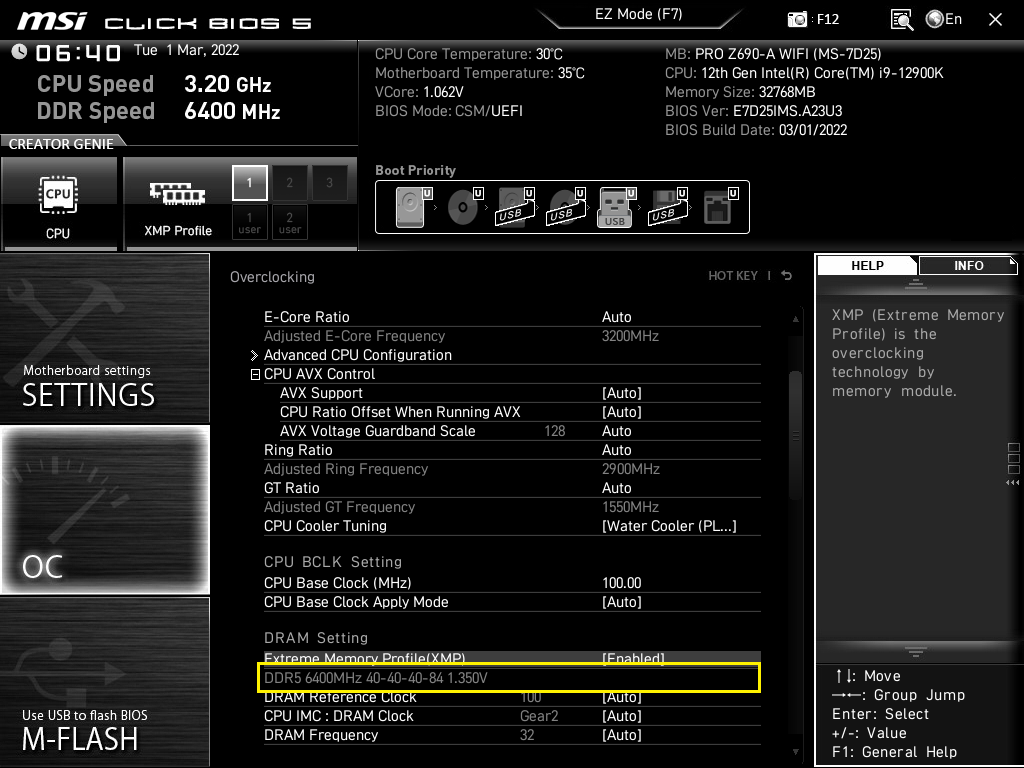
a. Press F7 to enter advanced mode
b. Go to the OC box (red box) on the left, select Extreme Memory Profile (X.M.P) (blue box) and press Enter.
c. Change Disable to Enabled (red box) and press Enter again to confirm.
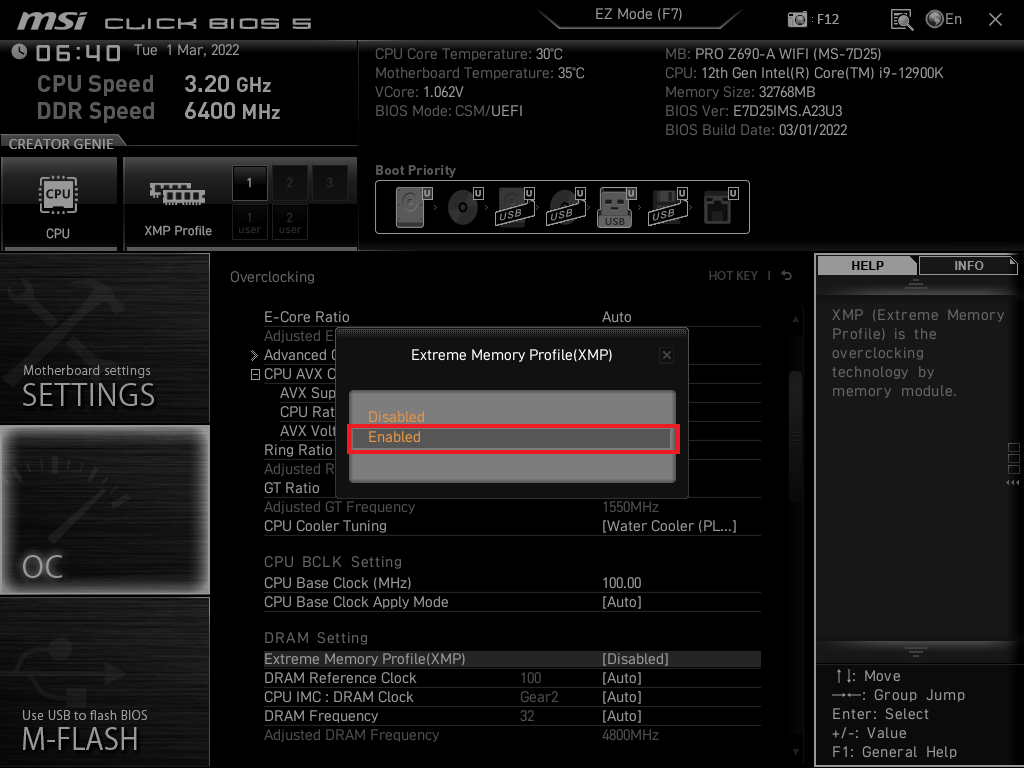
d. You will see the XMP information (yellow box) under Extreme Memory Profile, then press F10 to see and exit to enter Windows.
3. Confirm the overclocking information
After adjusting and entering Windows, we have to confirm whether the mwmory is running smoothly at the frequency we adjsuted. I'm used to using CPU-Z software to confirm. It is a free software, and you can download if from the link below.
CPU-Z download: https://reurl.cc/N63RGq
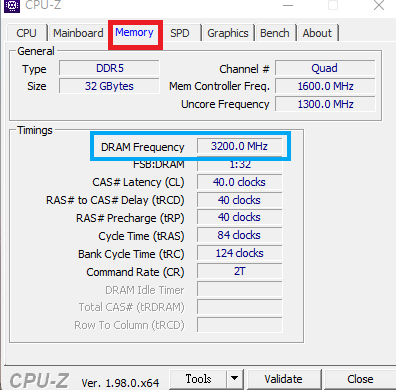
Take our DElTA RGB DDR5 6400MHz 16GBx2 as an example, after enabling XMP3.0, the actual operating frequency of the memory is as shown in the picture below.
After downloading and running CPU-Z, click on the Memory tab (red box) in the upper toolbar, then look at the DRAM frequency (blue box) at the bottom. The display value multiplied by 2 is the actual running frequency.
That's all for today. If you have any problems or want to know anything else, please leave your message below!


