Tutorial on the Use of Lighting Control Software for the Four Major Motherboard Manufacturers
Now that there is so many software for lighting control, which one should I choose? How do I use them? Currently, the four major motherboard manufacturers are leading in software integration and can control 90% of the lighting accessories on the market. Here’s the tutorial on how to use the software of four major motherboard manufacturers.
【ASUS-AURA】
If you don’t have this software yet, please download it from this link: https://www.asus.com/campaign/aura/jp/download.php
This is version 1.07.79. From this version onwards you can fully control the lighting mode of the beautiful T-FORCE XTREEM ARGB memory.
T-FORCE XTREEM ARGB DDR4: https://www.teamgroupinc.com/en/product/xtreem-argb-ddr4
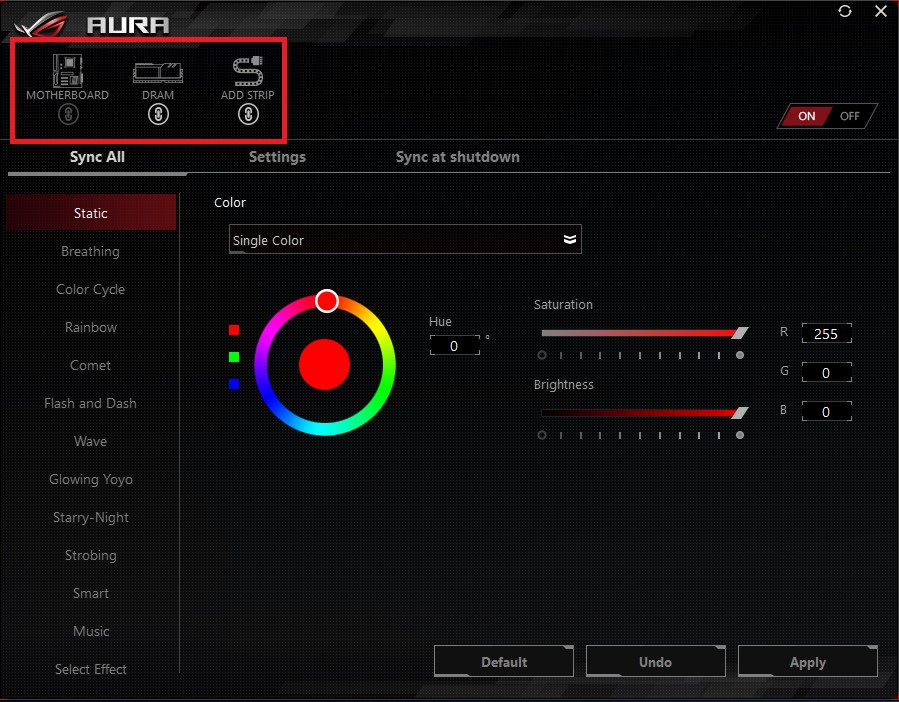
After opening the software, the top left corner shows devices that are currently detected and can be connected by the software. The white ones are currently connected. It will turn red and disconnect the device while clicking it.
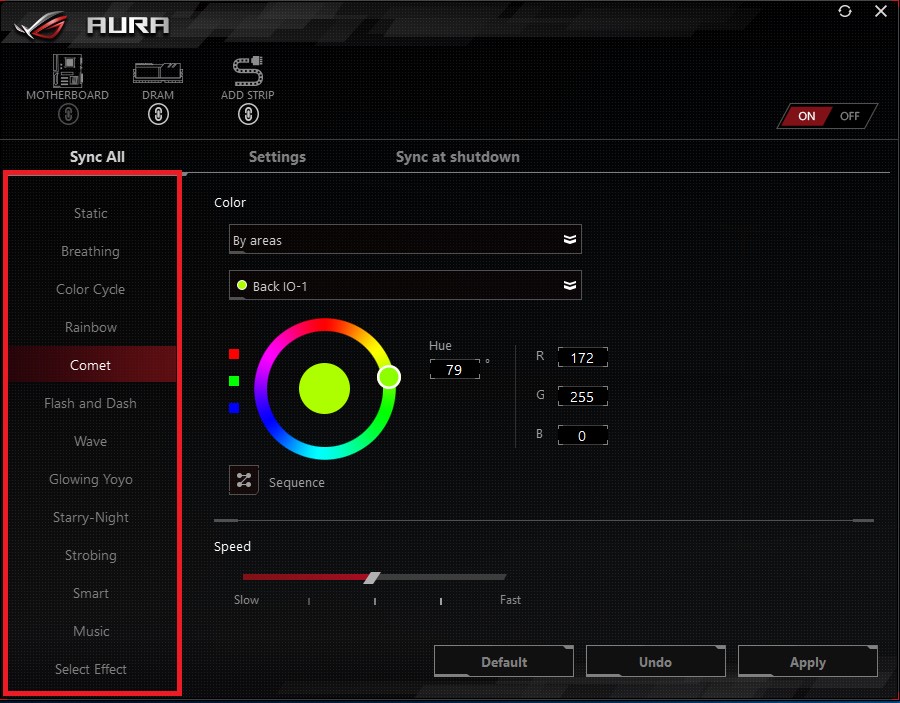
The entire row on the left is a variety of lighting effects, please select your preferred lighting mode.
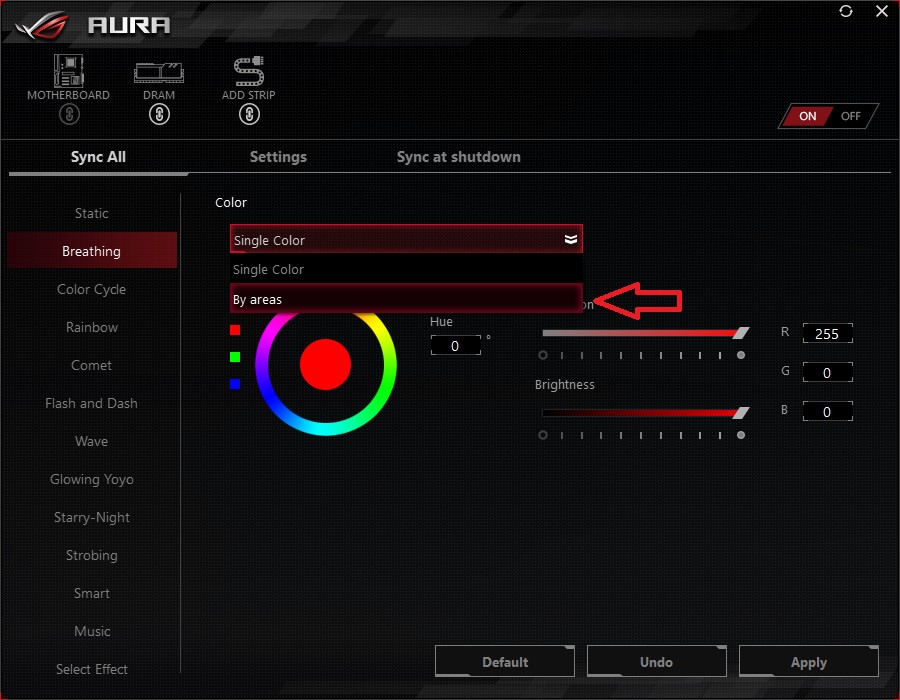
In the middle, you can select the same color for all lighting parts, or you can set the light by each area individually. If you want the same color, select “Single Color”, if you want to set it by yourself, select “By areas”.
Next, you can choose the location of the light on the motherboard or any light bead on the memory. It is completely self-customized, suitable for people who wants to create their own lighting style.
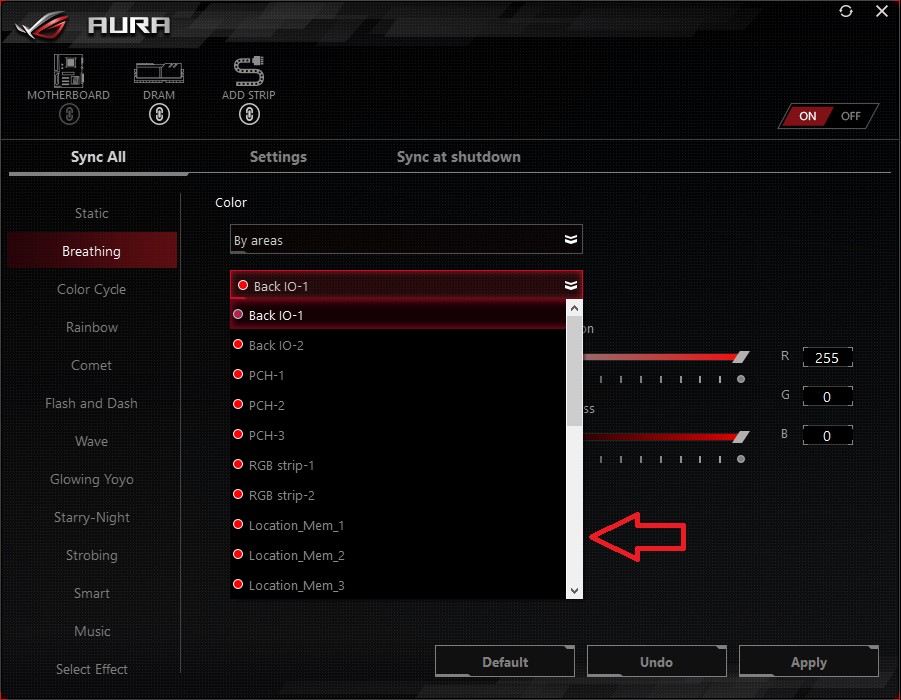
In the end are Color(1), Hue(2), Saturation and Brightness(3) adjustments. These are supported by almost every lighting control software.
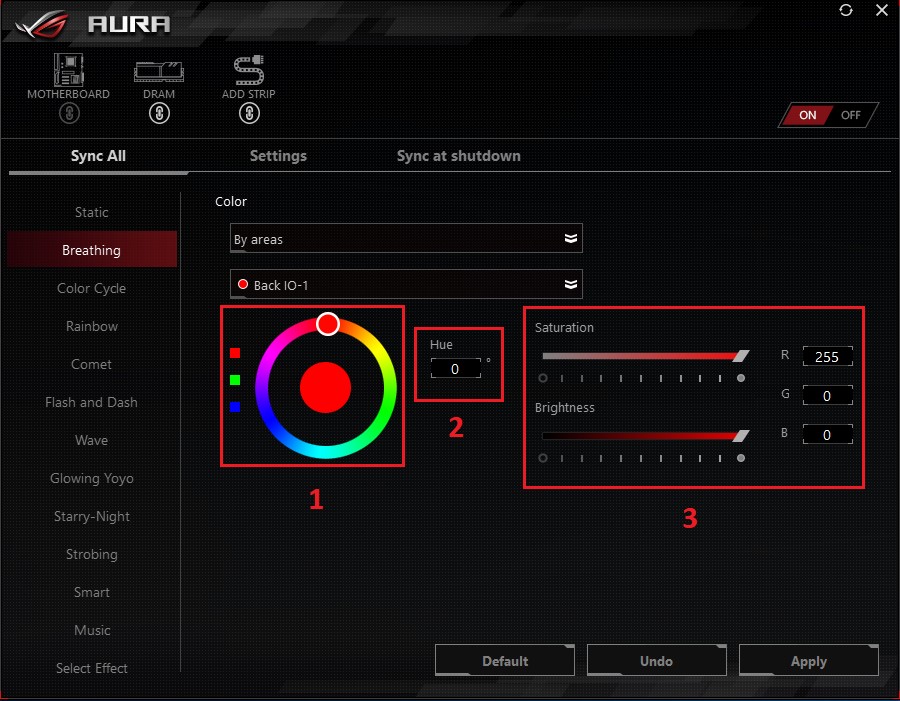
Overall, ASUS’s lighting control software is full of functions, with a wide selection of lighting effects, and the ability to control the color of each light bead. Highly recommended for those who have ASUS motherboards
ASUS Aura might be integrated into “Armoury Crate” integration software along with other ASUS motherboard related softwares in the future, which is the trend of motherboard manufacturers to meet the needs of gamers at this stage, but it is still in the transition period currently.
【MSI-MYSTIC LIGHT】
Please visit the download page of this software: https://www.msi.com/Landing/mystic-light-rgb-gaming-pc/download
The first thing you will see is “DRAGON CENTER(UWP VERSION)”, which is an integrated software that combines many MSI related softwares internally. If you are using the Windows 10 operating system, you need to download this integrated software, and then download Mystic Light within this software.
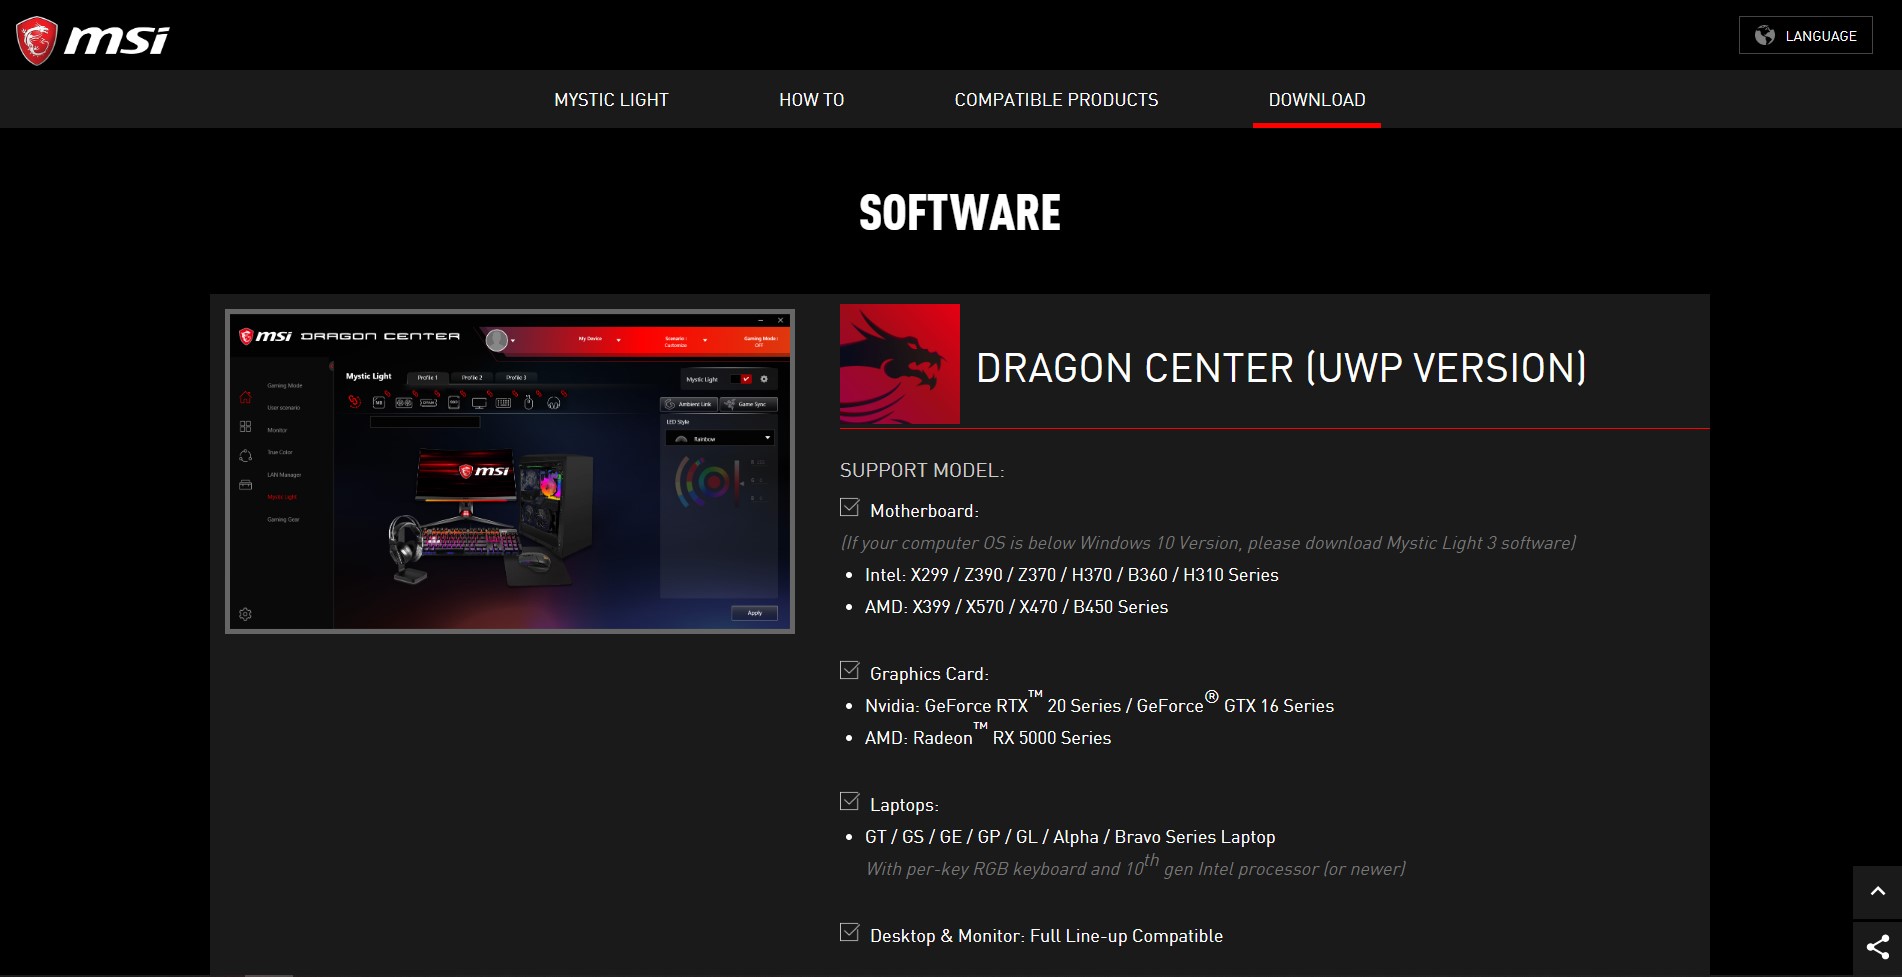
If you use operating system “below Windows 10” and your motherboard matches the motherboard model supported on this page, you will need to scroll down the page to find Mystic Light 3 software to control the lighting effect.
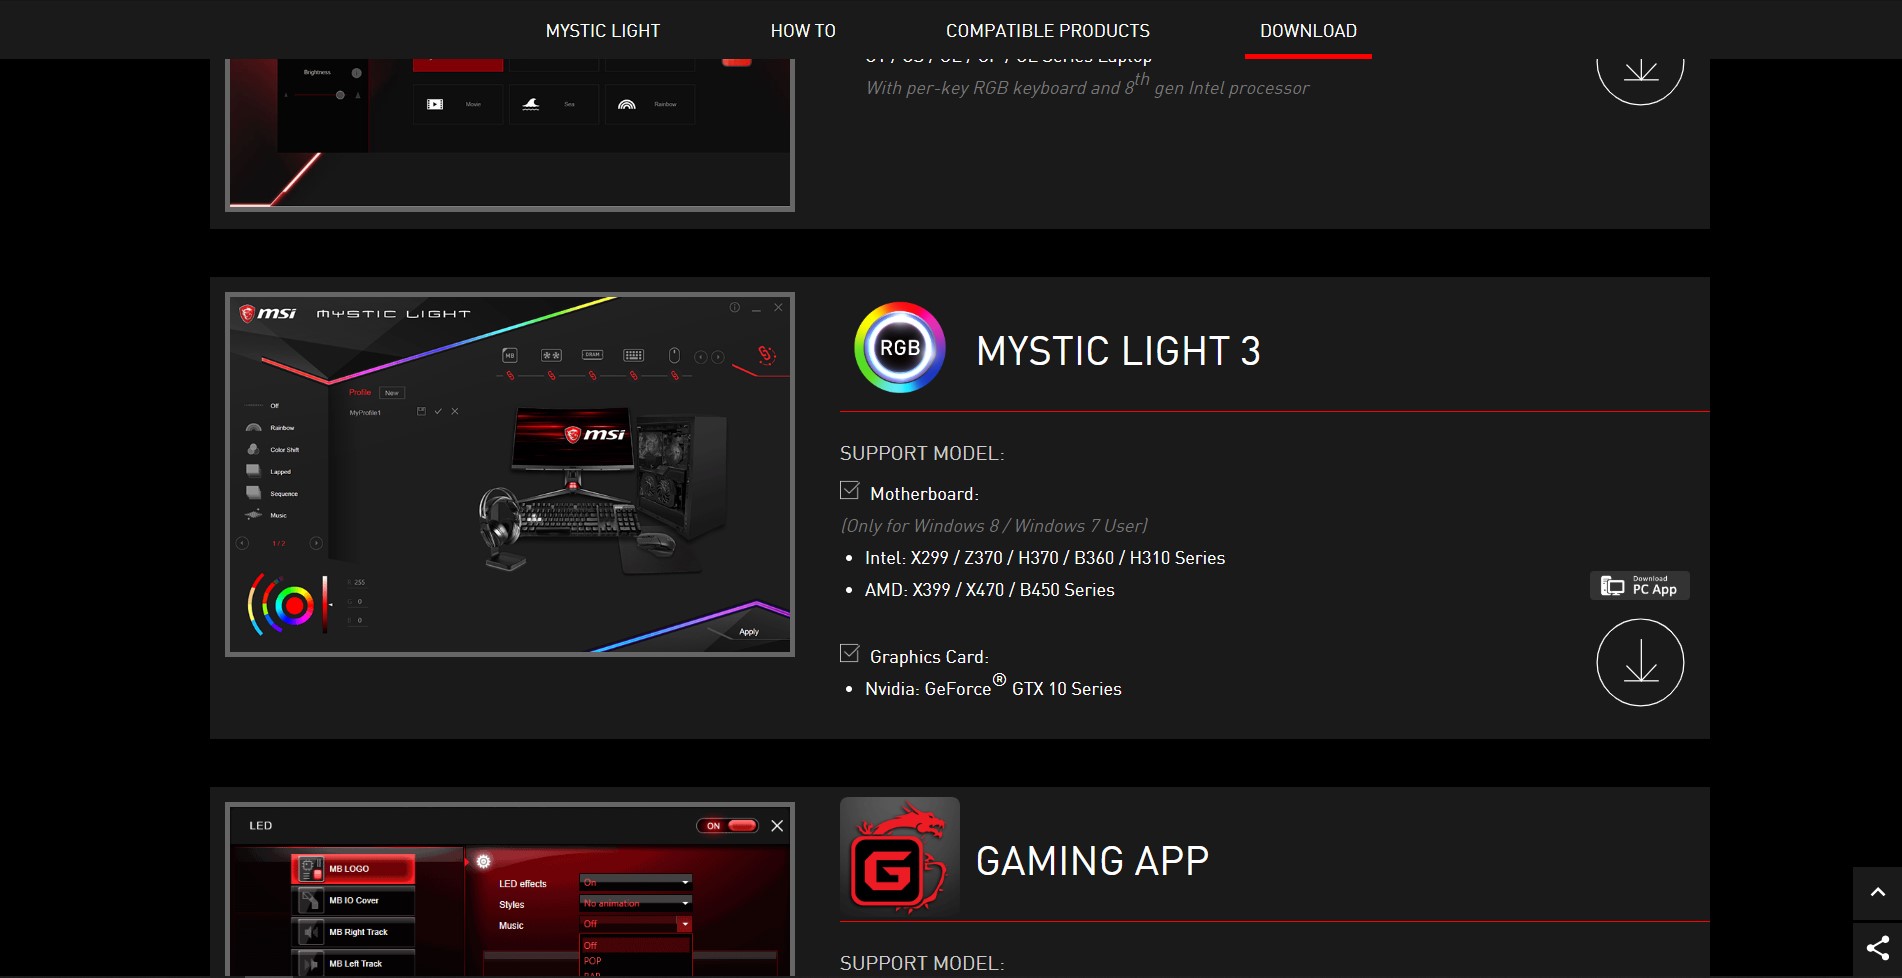
Next, follow the instructions while looking at the software: After click and open DRAGON CENTER, the internal software will be downloaded first. And when you officially enter, there is a row of software to choose from on the left side of the page, please click “Mystic Light”.
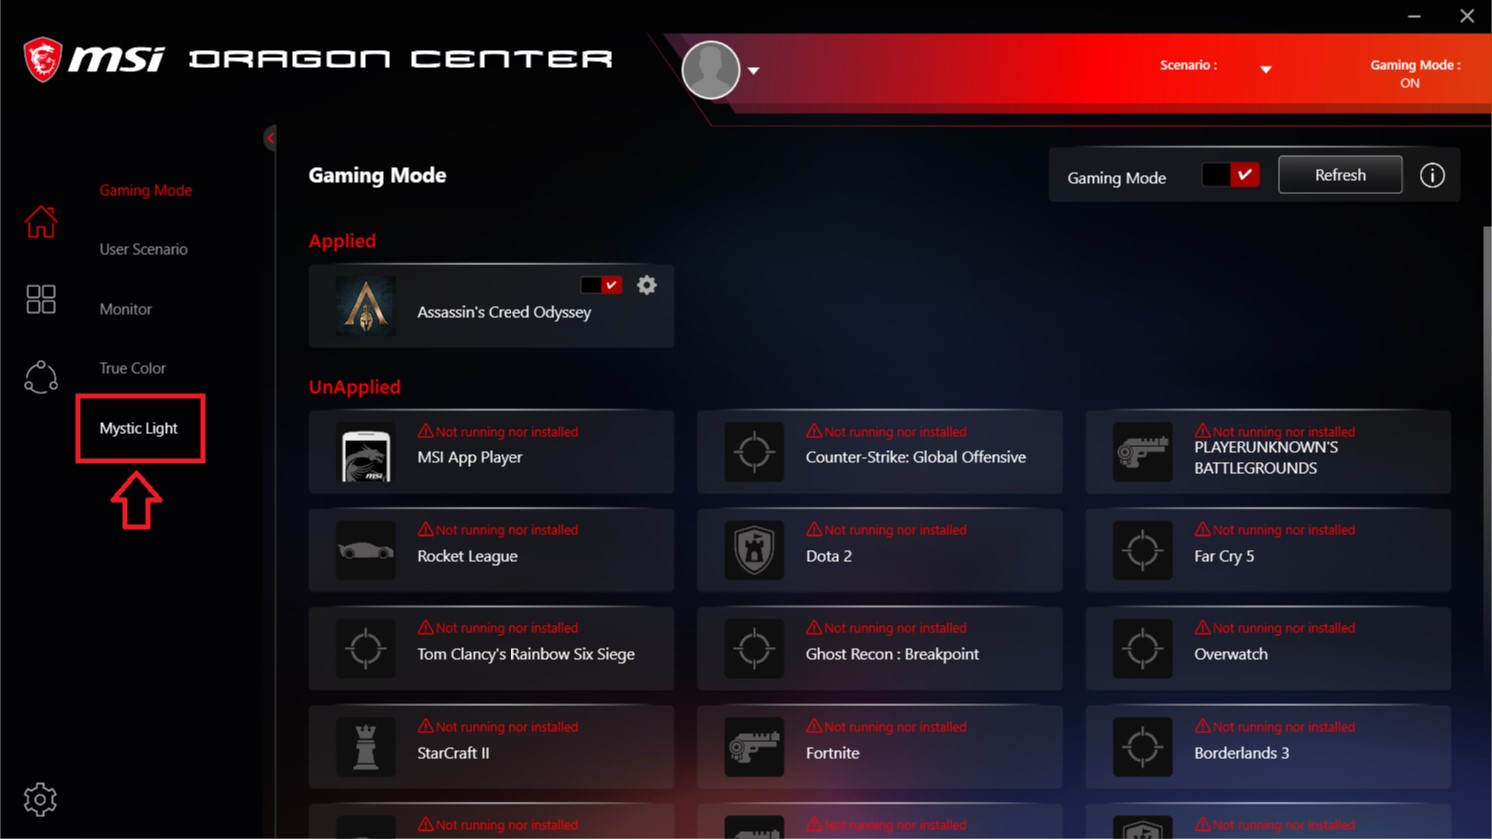
After entering the software, you will see the main screen which is the location to synchronize all the RGB and Mystic Light compatible accessories. Select the LED Style on the right and the whole system will run in the same lighting effect.
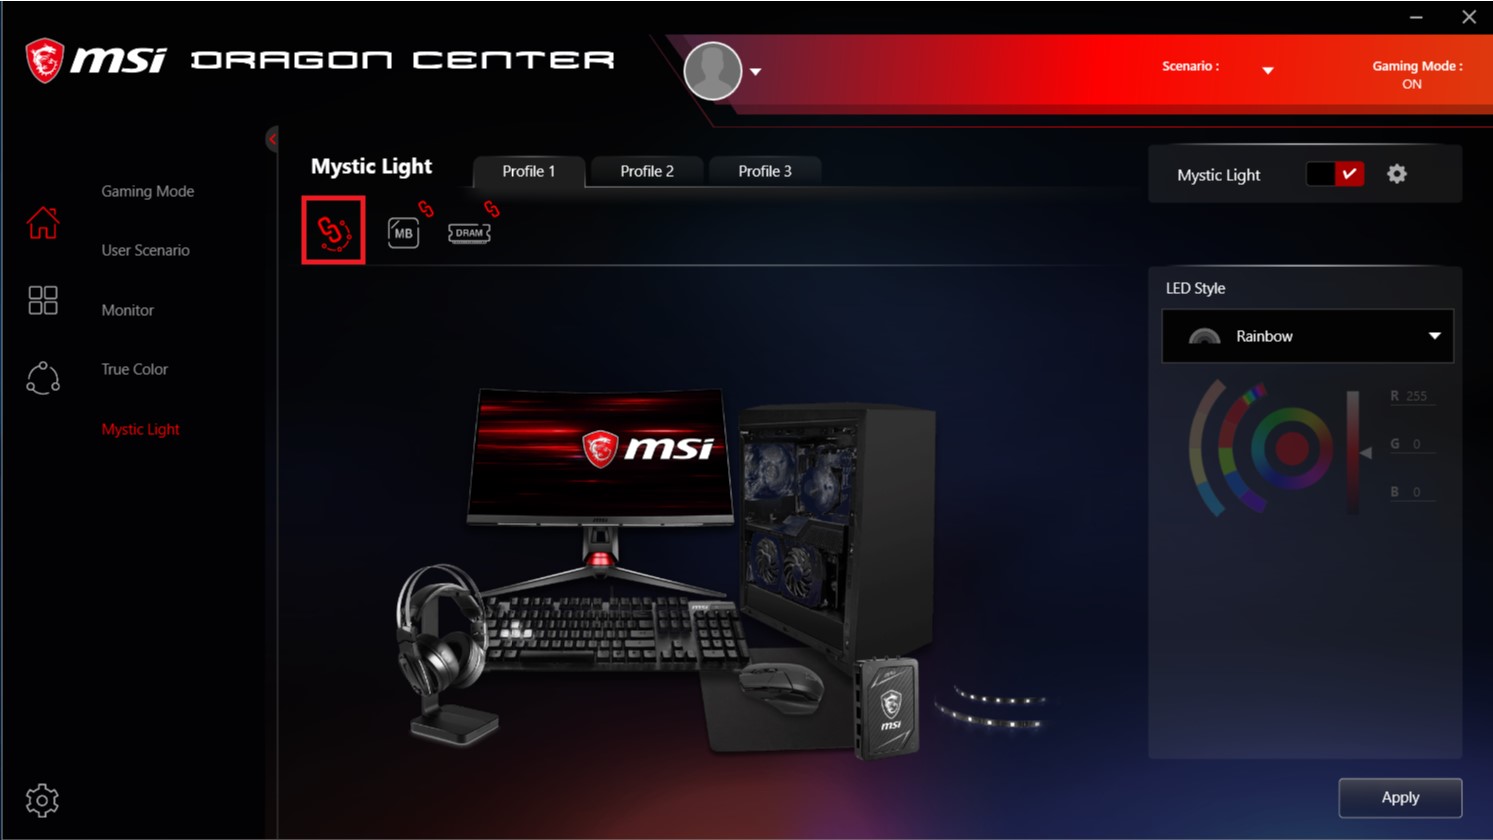
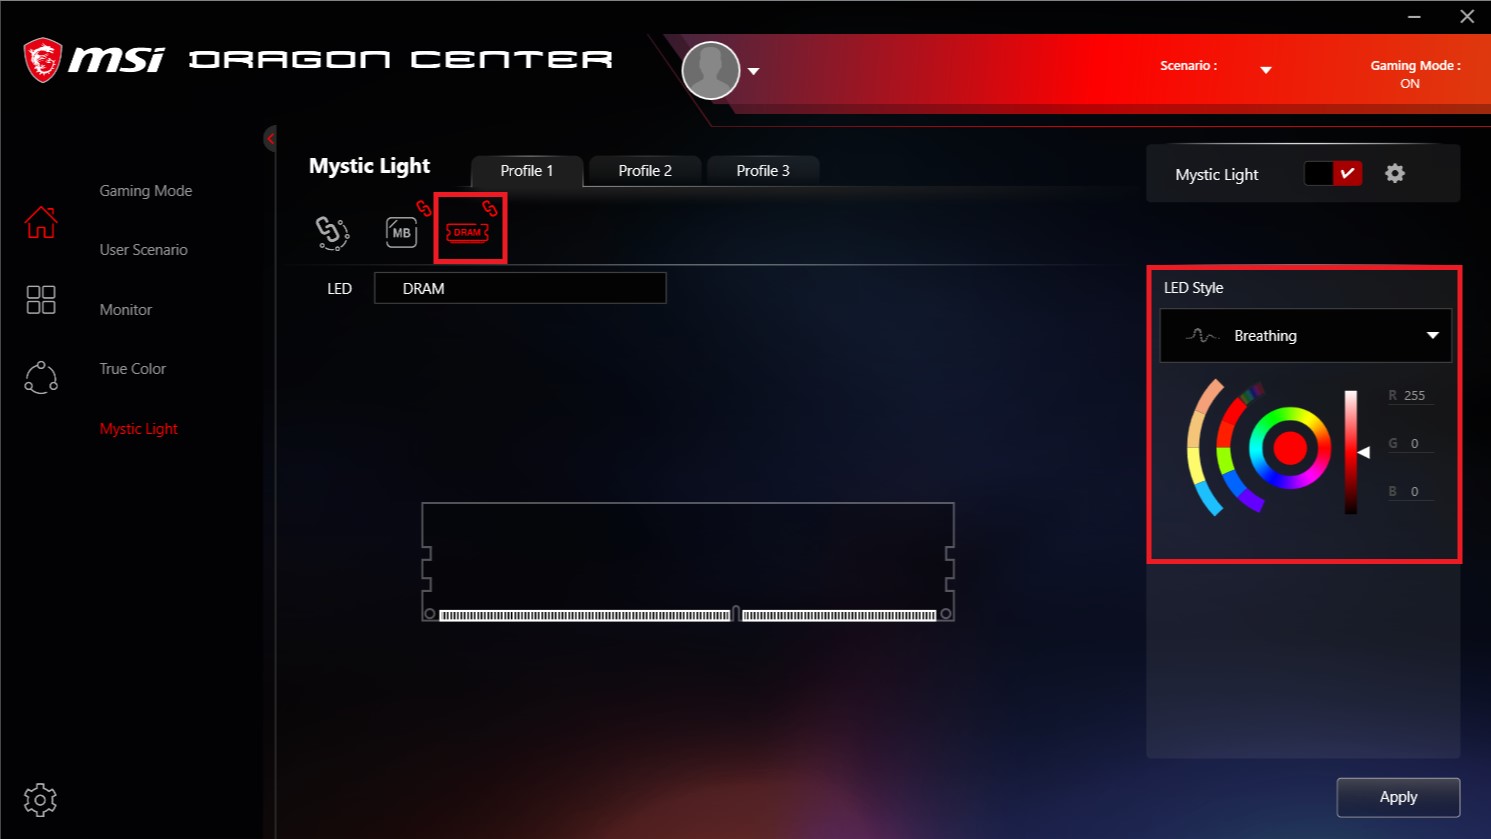
If you want to control T-FORCE memory individually, you can select the preferred mode and set the color by switching from the link-like logo above to the “DRAM”! Individual control not only has many effects, but you can also customize the color yourself, which can be very useful and gorgeous even when the whole system cannot be synchronized!
Don’t forget to click Apply in the bottom right corner whether you are synchronizing the entire system or controlling the memory individually.
If you are using an MSI motherboard, get a set of T-FORCE memory and let the memory rock along with your PC!
【GIGABYTE-RGB FUSION 2.0】
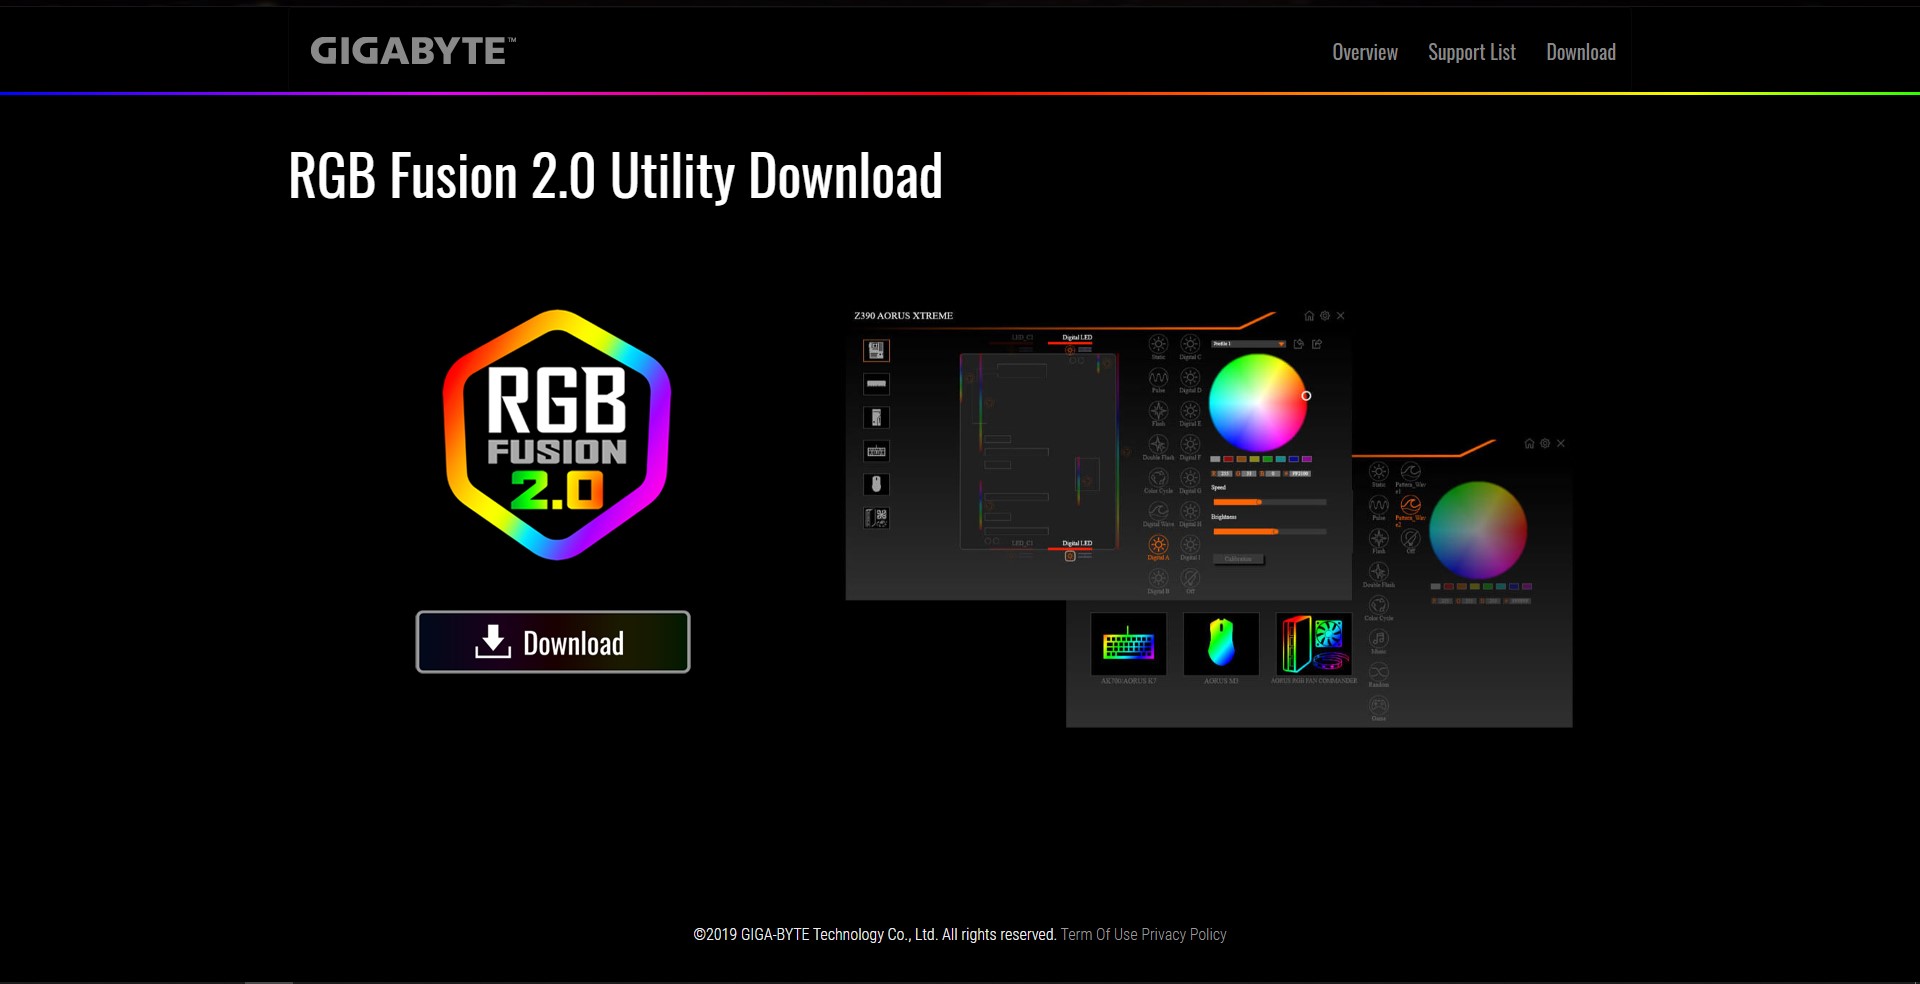
The download location of this software is relatively simple: https://www.gigabyte.com/MicroSite/512/download.html
Just click the Download button as shown below.
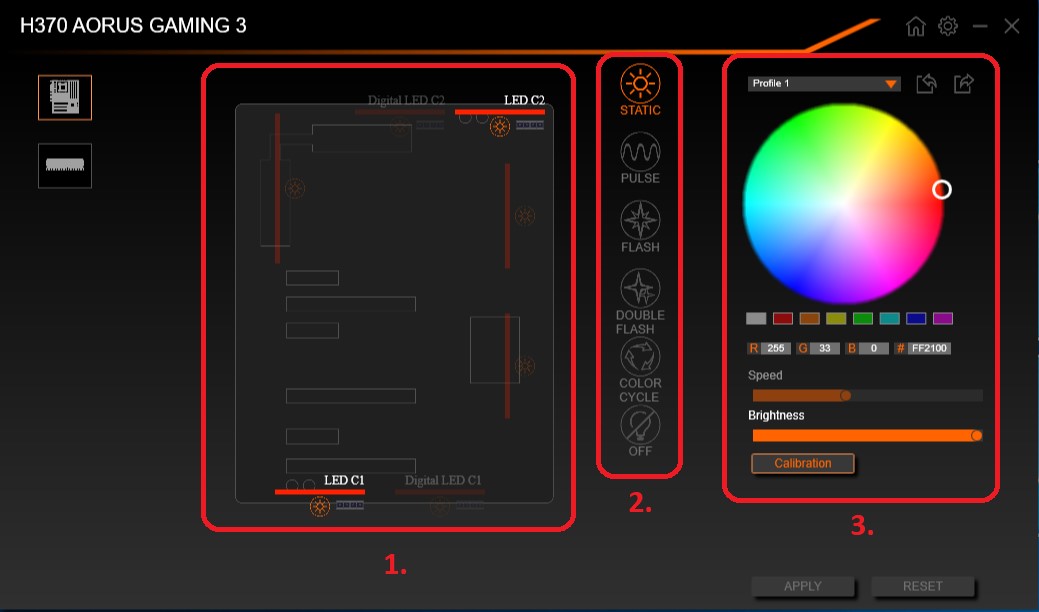
After opening the software, you will see the motherboard’s lighting effect control screen. The upper left corner will automatically show the motherboard you are using.
The screen is divided into three areas, first you have to choose which light you want to control in area 1, and then area 2, 3 will light up for operating. Area 2 is for selecting the effect, and area 3 is for selecting your preferred color, speed, brightness, etc. Remember to click APPLY after you finished selecting.
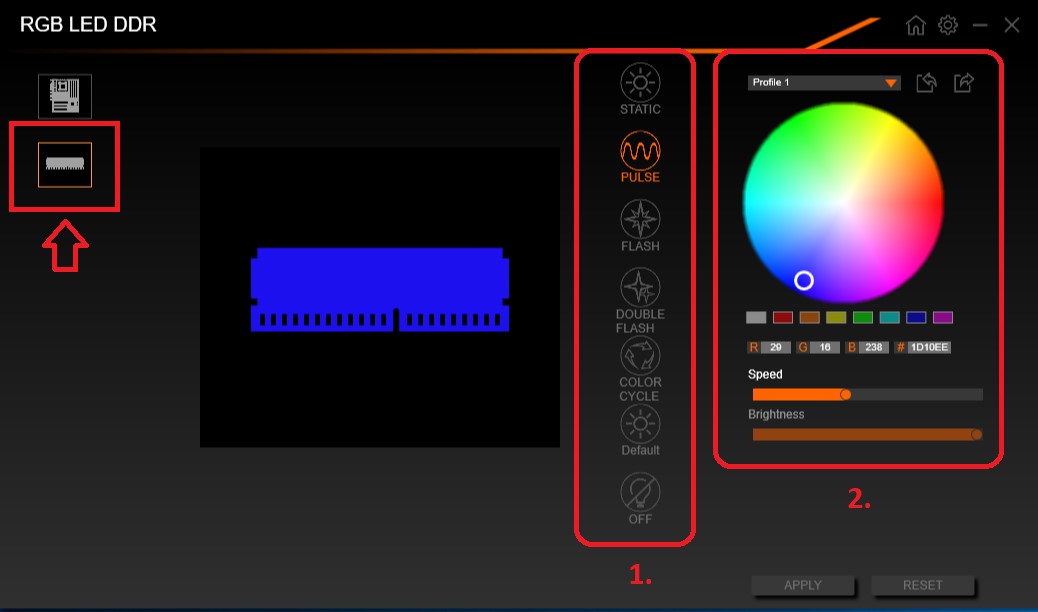
To operate the T-FORCE memory, first, click the memory logo under the motherboard on the left side, you will see a similar UI as the motherboard control screen, except that there is no light selection. The next steps are similar as well, including the adjustment for lighting effect, color, speed, and brightness.
It is recommended to set the speed at about half to avoid too much speed or too bright for your eyes.
【ASROCK- Polychrome RGB】
Please visit ASRock’s official website for software download. From Products pages, find the motherboard you are using, scroll down and click Support and then click Download. At the bottom you will see [Beta] ASRock Polychrome RGB, this is the latest version of the lighting control software.
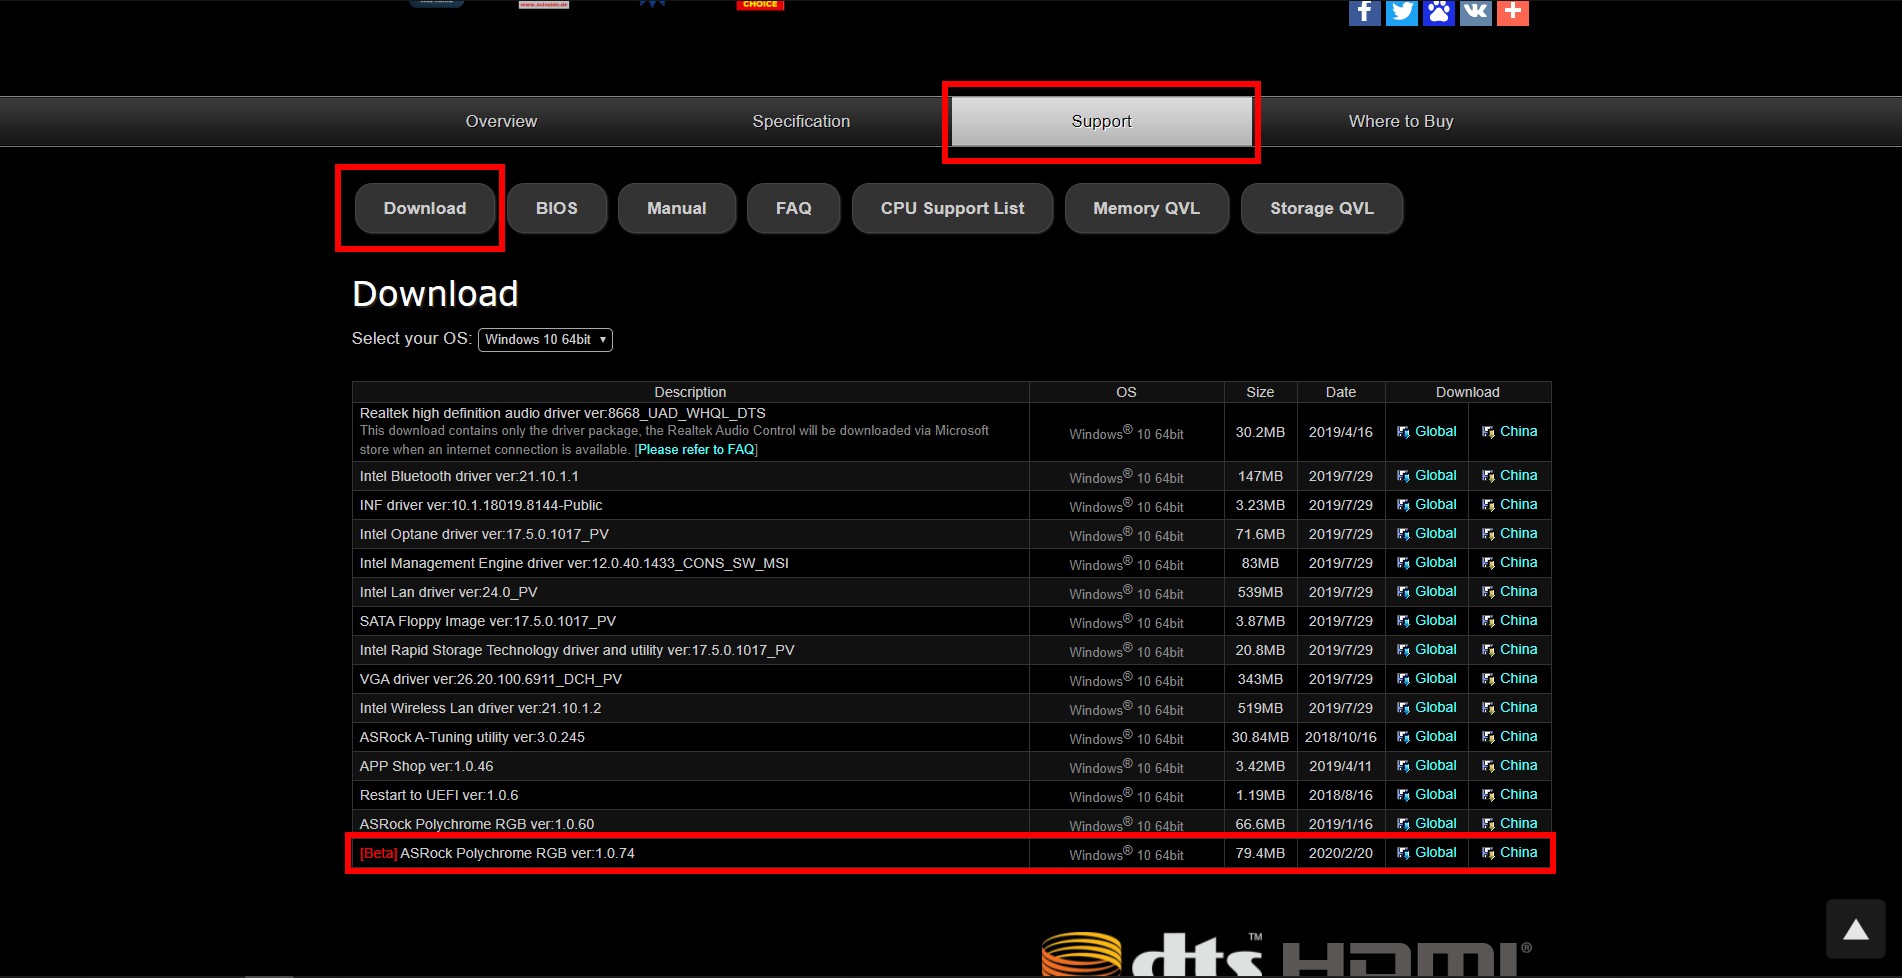
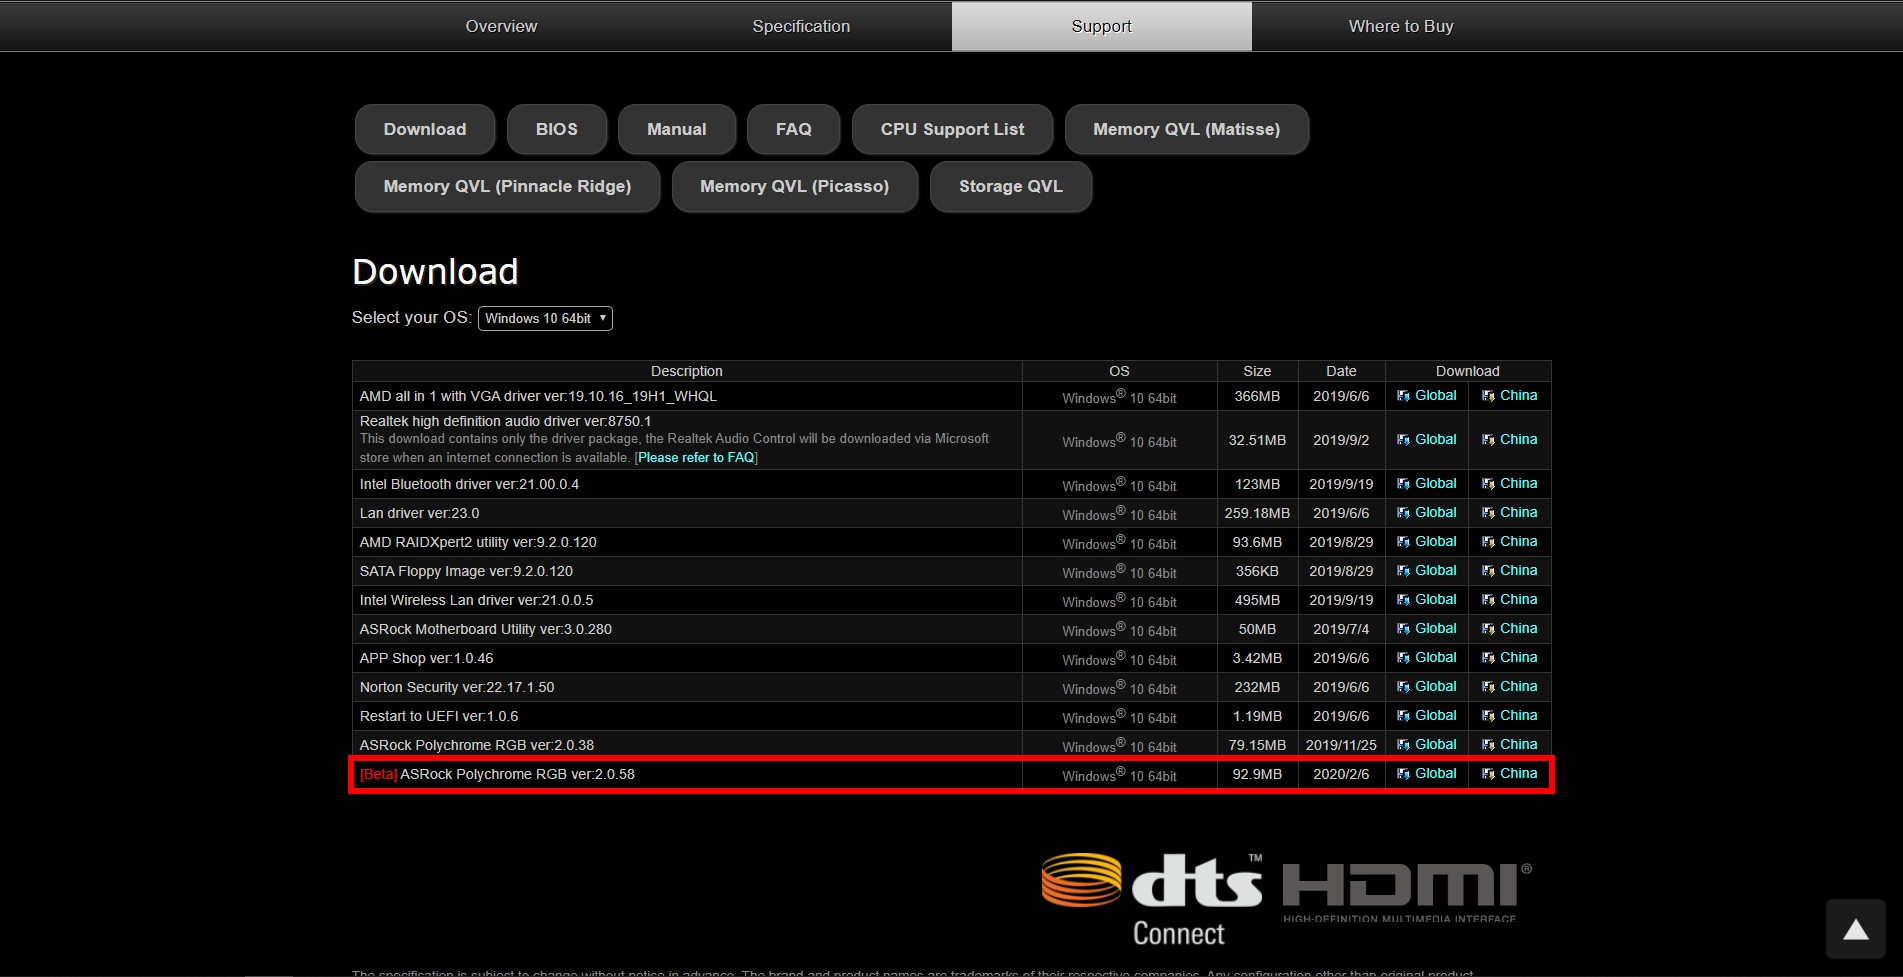
Please notice that AMD and Intel platforms have different version numbers, so be sure to download the software under the correct motherboard model!
Above is a screenshot of the Download page of the Z390 motherboard, and below is a screenshot of the X570 motherboard for reference.
The setup is also divided into synchronizing the entire system’s lighting effect, and setting the T-FORCE memory individually.
Let’s take a look at how to synchronize the memory and motherboard:
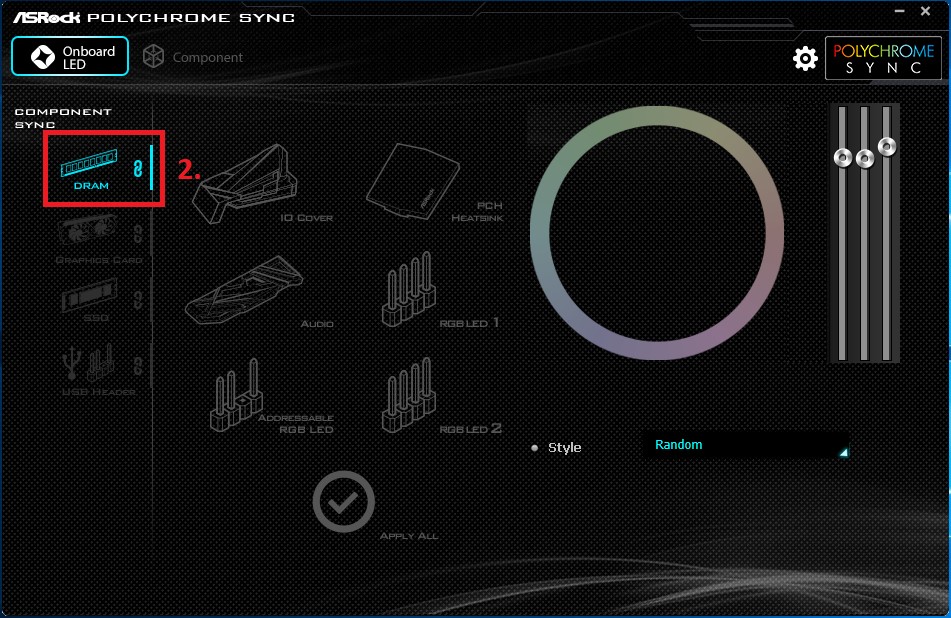
First, select the Onboard LED page, then click the DRAM logo on the bottom left.
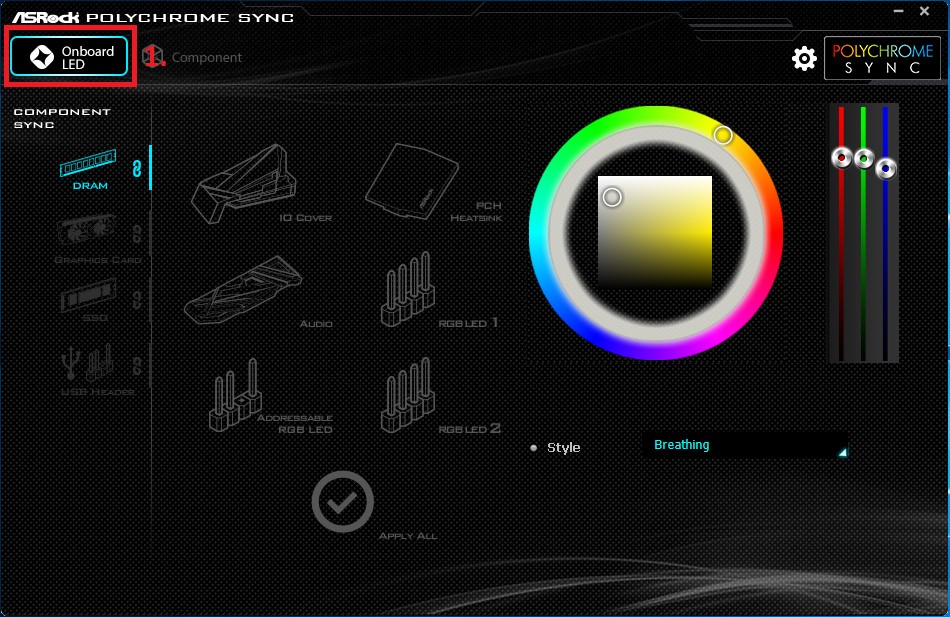
After selecting the lighting effect synchronization of the DRAM and the motherboard, you can only select Style, which is the only major limitation of this software. But ASRock has all kinds of good looking styles built in, the auto adjustment is a great feature for gamers who want to save time.
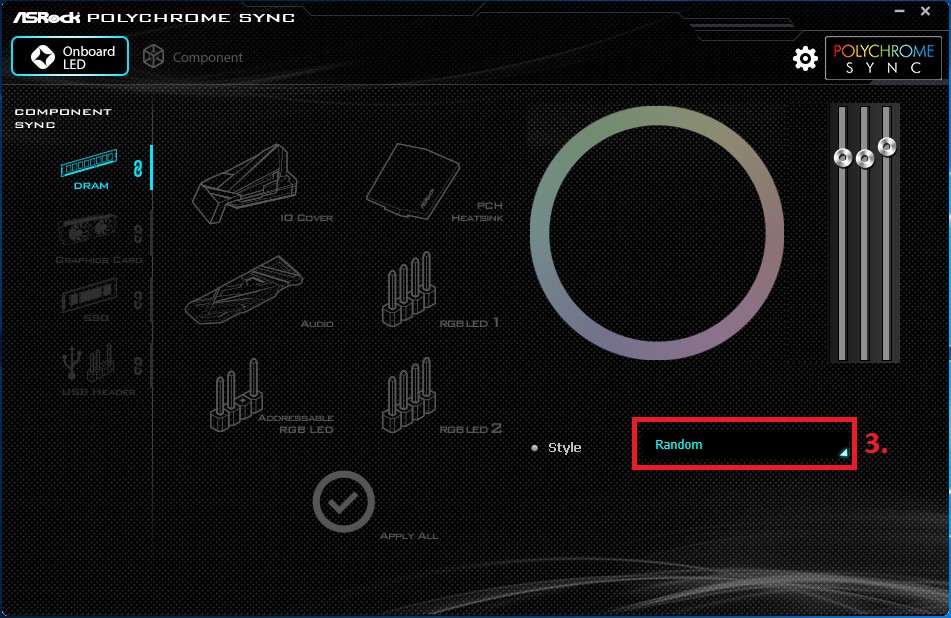
If you have more ideas about your own lighting style:
Before switching to control memory individually, you need to click “DRAM” above again to unselect it, and then you can switch pages in the upper left corner! Please stop asking why “Component” can’t be clicked, it’s because the synchronization is not cancelled first!
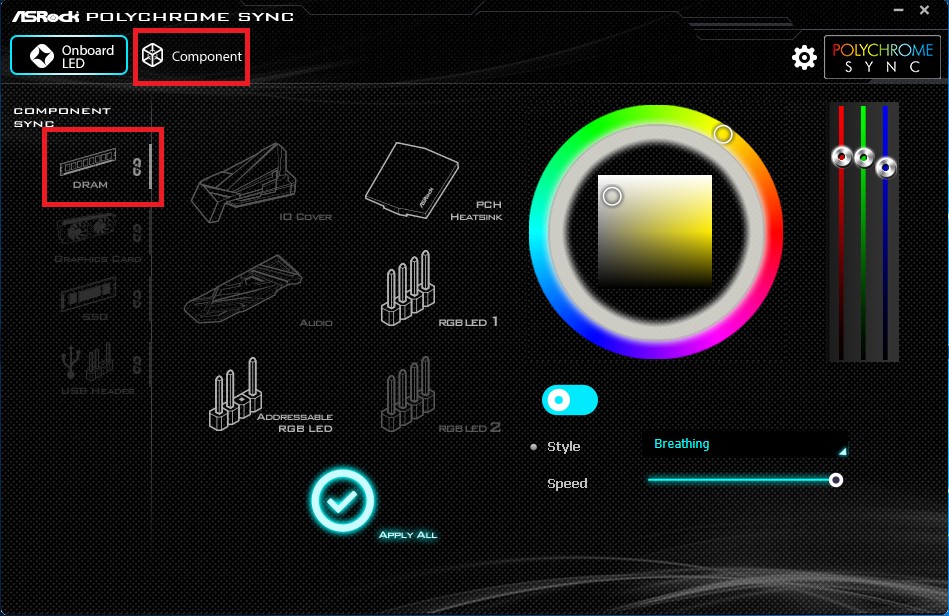
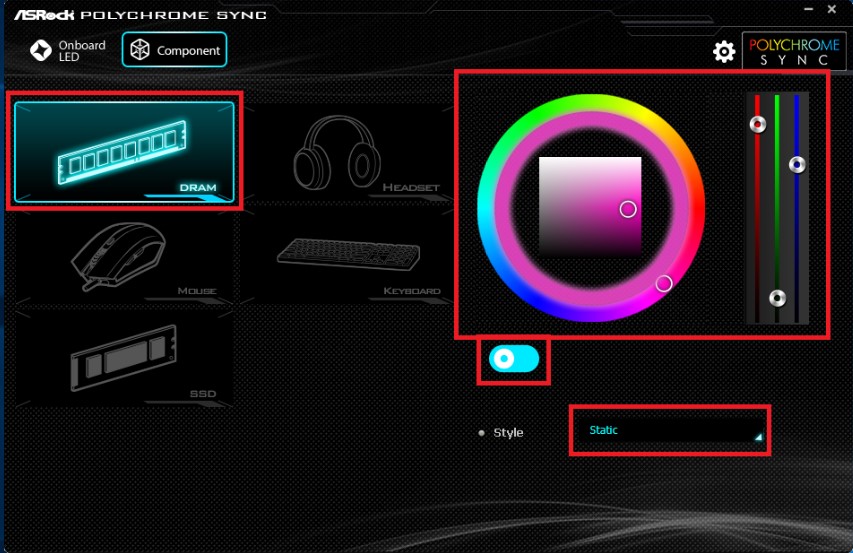
After unselecting DRAM, click “Component” on the upper left to enter the page for controlling the memory individually. You can adjust the color, brightness, style, etc., and even turn off the light of the memory alone.
T-FORCE XCALIBUR Phantom Gaming RGB DDR4: https://www.teamgroupinc.com/en/product/xcalibur-rgb-pg-ddr4
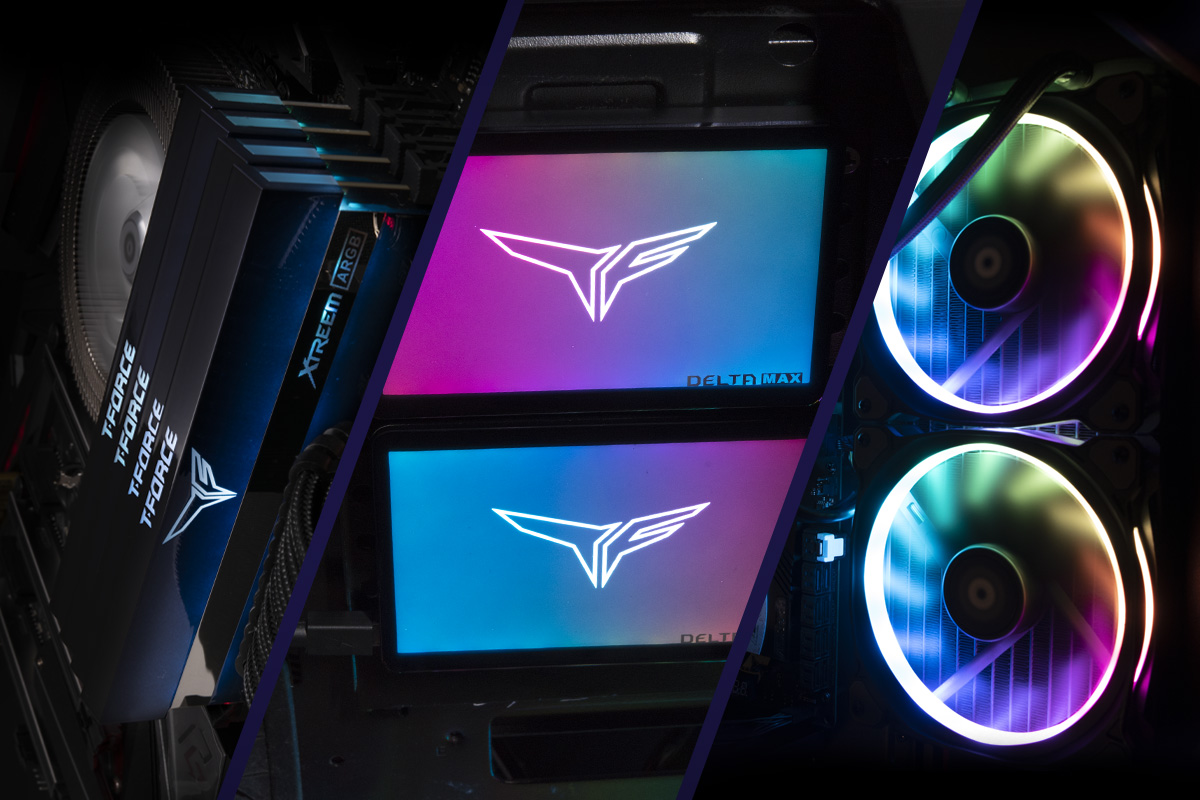
The functions of the lighting control software of the four motherboard manufacturers are very similar, and they are all very well integrated. You can control the motherboard, memory, SSD, keyboard, mouse and other accessories at the same time, without having to install a bunch of software to control them individually.

【ASUS-AURA】
If you don’t have this software yet, please download it from this link: https://www.asus.com/campaign/aura/jp/download.php
This is version 1.07.79. From this version onwards you can fully control the lighting mode of the beautiful T-FORCE XTREEM ARGB memory.
T-FORCE XTREEM ARGB DDR4: https://www.teamgroupinc.com/en/product/xtreem-argb-ddr4
After opening the software, the top left corner shows devices that are currently detected and can be connected by the software. The white ones are currently connected. It will turn red and disconnect the device while clicking it.

The entire row on the left is a variety of lighting effects, please select your preferred lighting mode.

In the middle, you can select the same color for all lighting parts, or you can set the light by each area individually. If you want the same color, select “Single Color”, if you want to set it by yourself, select “By areas”.

Next, you can choose the location of the light on the motherboard or any light bead on the memory. It is completely self-customized, suitable for people who wants to create their own lighting style.

In the end are Color(1), Hue(2), Saturation and Brightness(3) adjustments. These are supported by almost every lighting control software.

Overall, ASUS’s lighting control software is full of functions, with a wide selection of lighting effects, and the ability to control the color of each light bead. Highly recommended for those who have ASUS motherboards
ASUS Aura might be integrated into “Armoury Crate” integration software along with other ASUS motherboard related softwares in the future, which is the trend of motherboard manufacturers to meet the needs of gamers at this stage, but it is still in the transition period currently.
【MSI-MYSTIC LIGHT】
Please visit the download page of this software: https://www.msi.com/Landing/mystic-light-rgb-gaming-pc/download
The first thing you will see is “DRAGON CENTER(UWP VERSION)”, which is an integrated software that combines many MSI related softwares internally. If you are using the Windows 10 operating system, you need to download this integrated software, and then download Mystic Light within this software.

If you use operating system “below Windows 10” and your motherboard matches the motherboard model supported on this page, you will need to scroll down the page to find Mystic Light 3 software to control the lighting effect.

Next, follow the instructions while looking at the software: After click and open DRAGON CENTER, the internal software will be downloaded first. And when you officially enter, there is a row of software to choose from on the left side of the page, please click “Mystic Light”.

After entering the software, you will see the main screen which is the location to synchronize all the RGB and Mystic Light compatible accessories. Select the LED Style on the right and the whole system will run in the same lighting effect.

If you want to control T-FORCE memory individually, you can select the preferred mode and set the color by switching from the link-like logo above to the “DRAM”! Individual control not only has many effects, but you can also customize the color yourself, which can be very useful and gorgeous even when the whole system cannot be synchronized!
Don’t forget to click Apply in the bottom right corner whether you are synchronizing the entire system or controlling the memory individually.

If you are using an MSI motherboard, get a set of T-FORCE memory and let the memory rock along with your PC!
【GIGABYTE-RGB FUSION 2.0】
The download location of this software is relatively simple: https://www.gigabyte.com/MicroSite/512/download.html
Just click the Download button as shown below.

After opening the software, you will see the motherboard’s lighting effect control screen. The upper left corner will automatically show the motherboard you are using.
The screen is divided into three areas, first you have to choose which light you want to control in area 1, and then area 2, 3 will light up for operating. Area 2 is for selecting the effect, and area 3 is for selecting your preferred color, speed, brightness, etc. Remember to click APPLY after you finished selecting.

To operate the T-FORCE memory, first, click the memory logo under the motherboard on the left side, you will see a similar UI as the motherboard control screen, except that there is no light selection. The next steps are similar as well, including the adjustment for lighting effect, color, speed, and brightness.
It is recommended to set the speed at about half to avoid too much speed or too bright for your eyes.

【ASROCK- Polychrome RGB】
Please visit ASRock’s official website for software download. From Products pages, find the motherboard you are using, scroll down and click Support and then click Download. At the bottom you will see [Beta] ASRock Polychrome RGB, this is the latest version of the lighting control software.

Please notice that AMD and Intel platforms have different version numbers, so be sure to download the software under the correct motherboard model!
Above is a screenshot of the Download page of the Z390 motherboard, and below is a screenshot of the X570 motherboard for reference.

The setup is also divided into synchronizing the entire system’s lighting effect, and setting the T-FORCE memory individually.
Let’s take a look at how to synchronize the memory and motherboard:
First, select the Onboard LED page, then click the DRAM logo on the bottom left.

After selecting the lighting effect synchronization of the DRAM and the motherboard, you can only select Style, which is the only major limitation of this software. But ASRock has all kinds of good looking styles built in, the auto adjustment is a great feature for gamers who want to save time.


If you have more ideas about your own lighting style:
Before switching to control memory individually, you need to click “DRAM” above again to unselect it, and then you can switch pages in the upper left corner! Please stop asking why “Component” can’t be clicked, it’s because the synchronization is not cancelled first!

After unselecting DRAM, click “Component” on the upper left to enter the page for controlling the memory individually. You can adjust the color, brightness, style, etc., and even turn off the light of the memory alone.
T-FORCE XCALIBUR Phantom Gaming RGB DDR4: https://www.teamgroupinc.com/en/product/xcalibur-rgb-pg-ddr4

The functions of the lighting control software of the four motherboard manufacturers are very similar, and they are all very well integrated. You can control the motherboard, memory, SSD, keyboard, mouse and other accessories at the same time, without having to install a bunch of software to control them individually.


